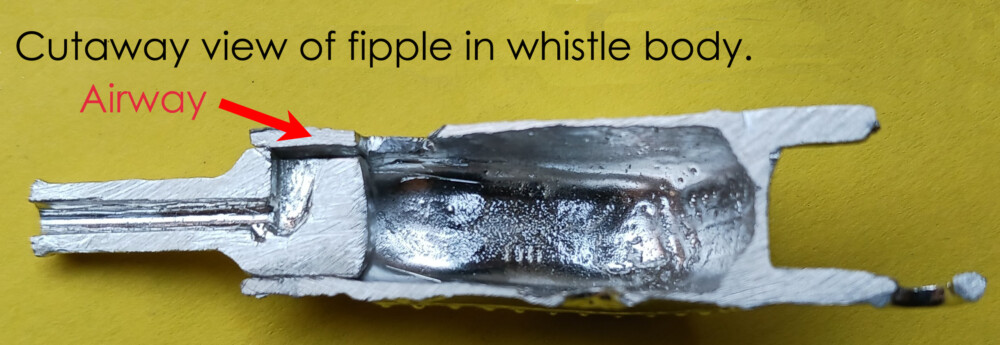
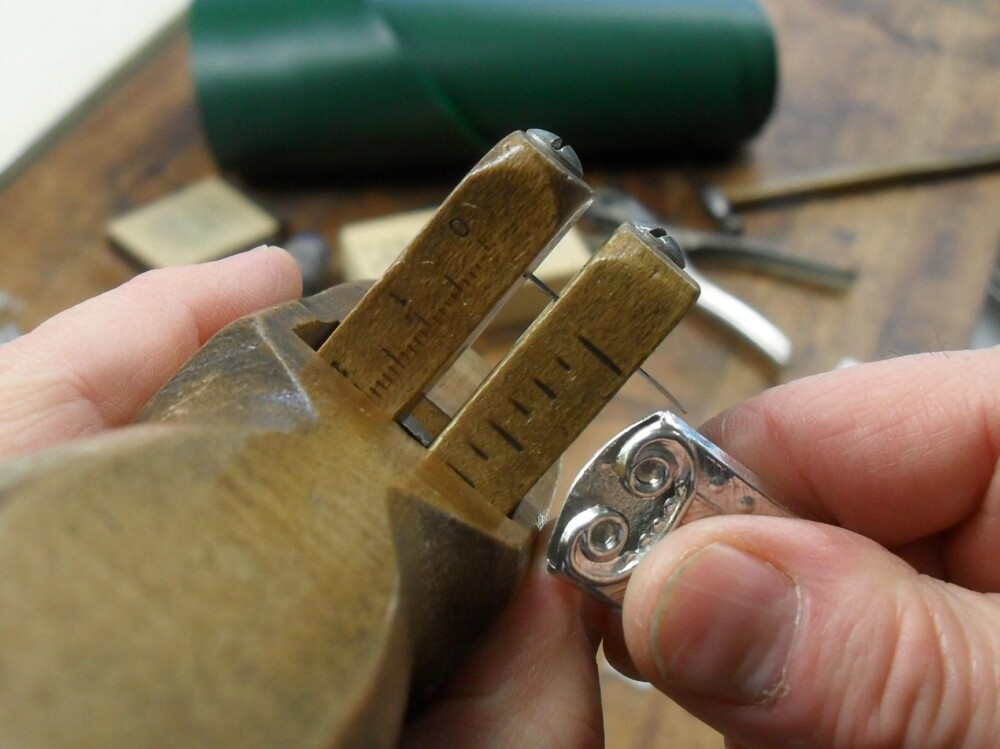
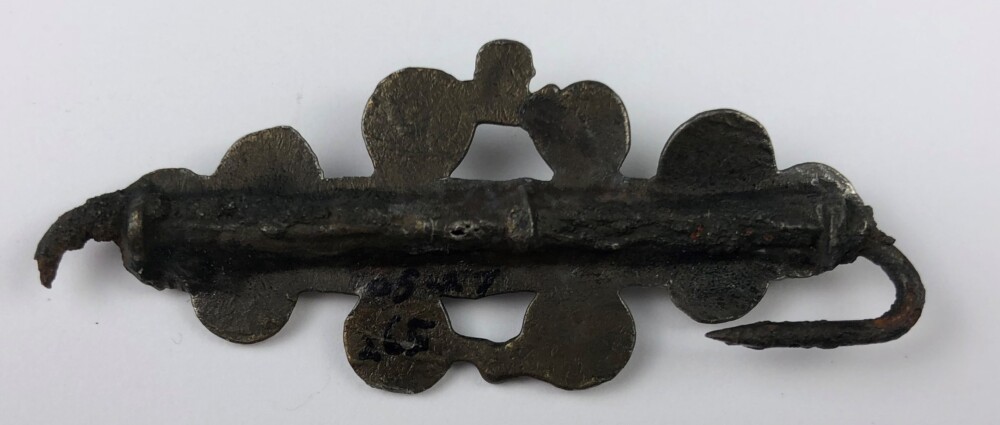
Whistles “whistle” because the air you blow into them is directed against a sharp edge. A fipple is the part of the whistle that shapes the air into a smoothly flowing stream and directs it against that sharp edge. When this works, you get a nice clear sound. When it does not work, you get a muddy and/or hiss-y sound….
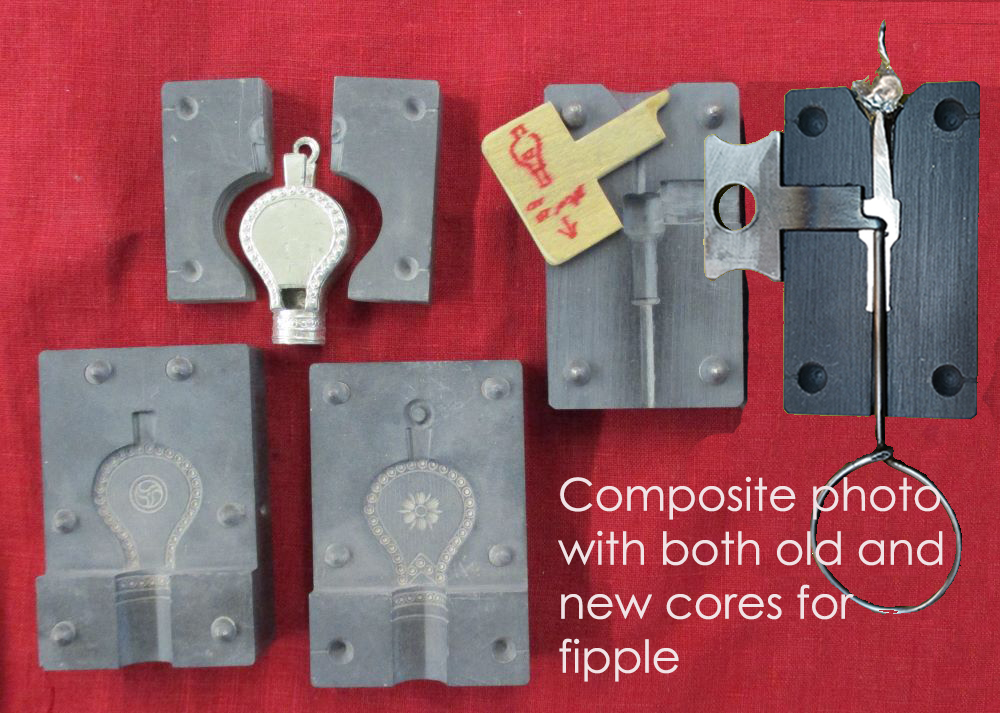
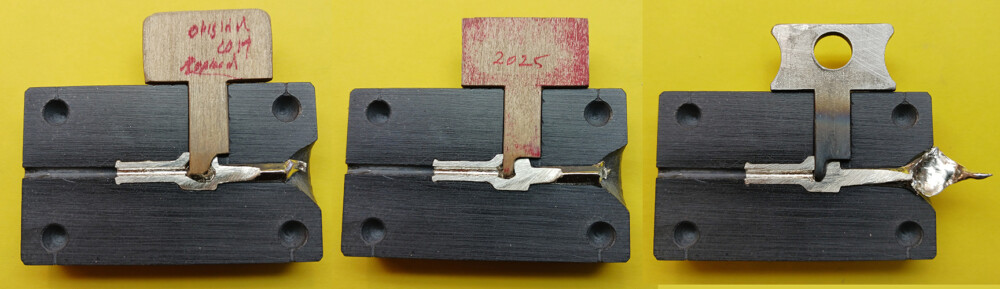
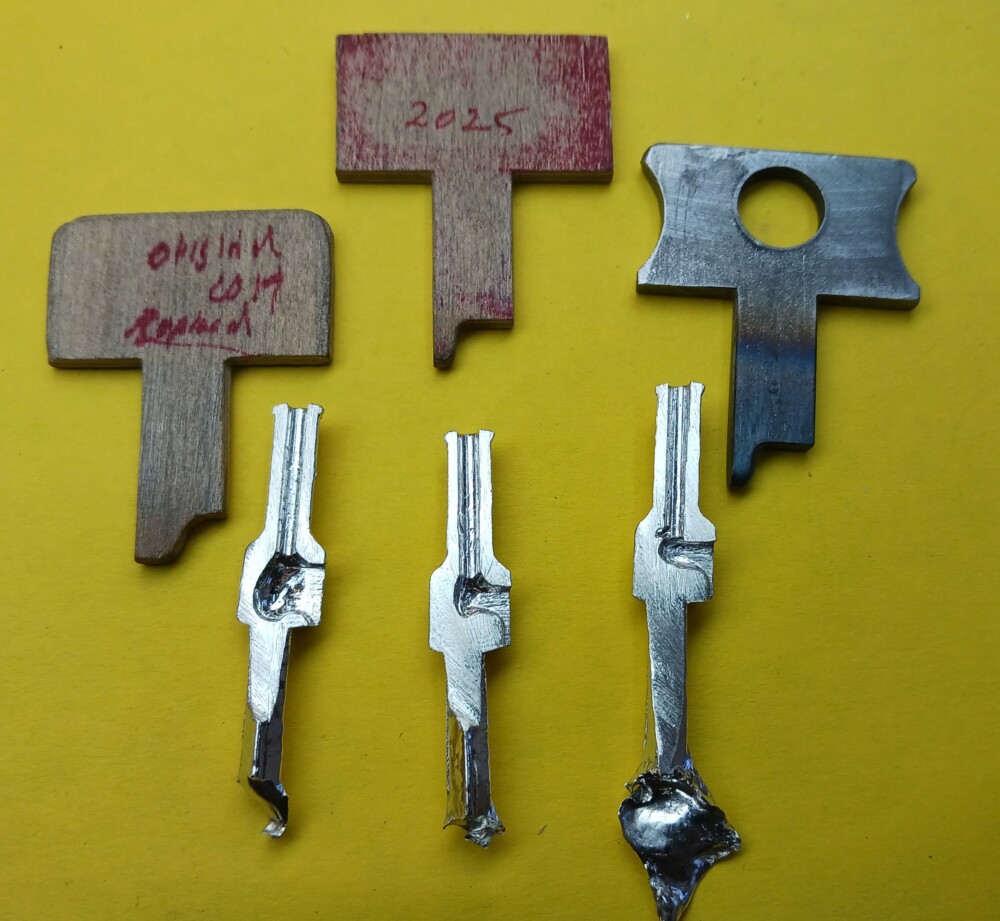
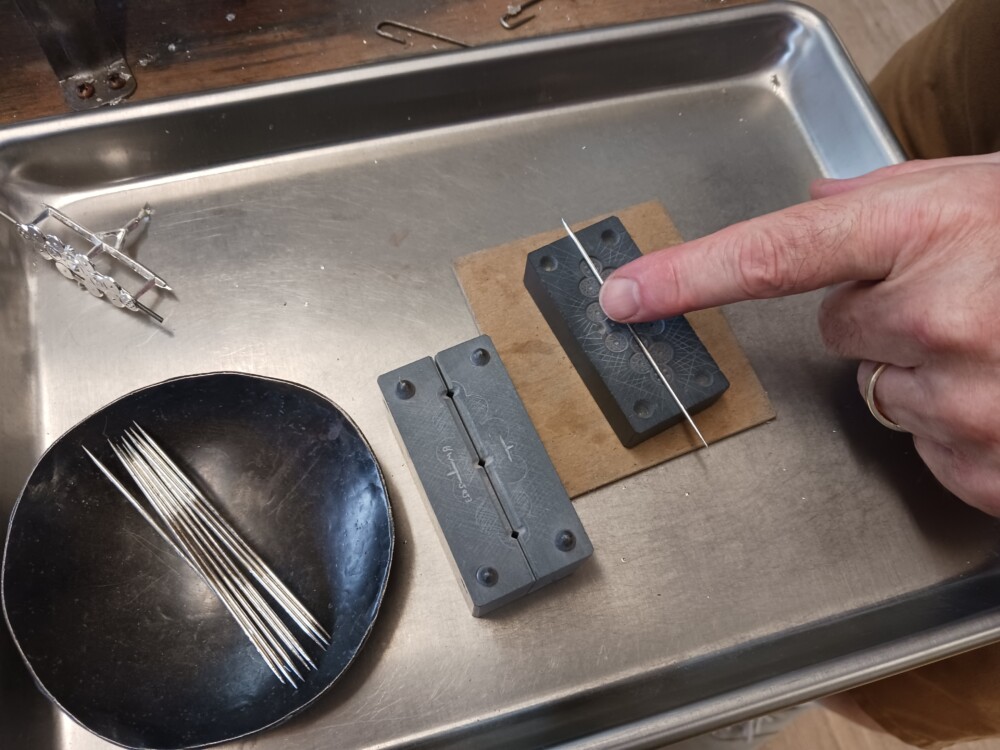
…which was happening with our otherwise excellent Bellows Whistle. This is a complex item made in tin with two separate molds. The outer part is slush cast (we fill up the entire mold with tin, let it cool enough that the outside solidifies into a shell, and pour out the still molten tin inside). The fipple is cast in a separate mold. It has a wire core to make the tube you blow into, and a second core to shape the airway.
As the metal cools it shrinks – and in this case the tin poured into the fipple mold shrank and created a rough-walled, hollowed out, sloppy airway that did not retain the shape of the core. This made the whistle sound weak and hiss-y. Mac made a core, then a replacement core, trying to solve the problem when we introduced the whistle. The next time he cast it he made a third. When he started casting it most recently, he made a fourth. Although there was some improvement, the airflow was still turbulent.
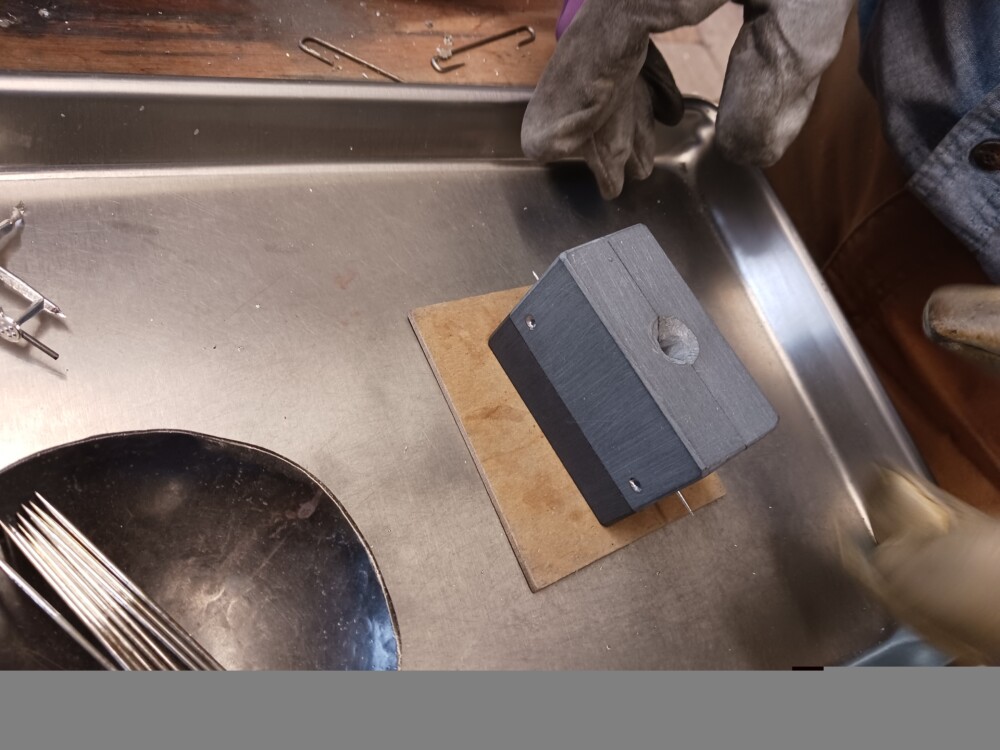
Because the problem was caused by the metal shrinking away from the wooden cores, on his fifth attempt Mac introduced a “chill” to affect the cooling pattern by making the mold from steel. This pulls heat out of the tin faster than the stone mold does, so the metal solidifies around it, retaining the shape of the mold. We need indentations in the steel core to pull it out of the mold, because the cast piece is so much tighter.
When the new fipple is inserted and soldered into the body of the whistle, the airway is much cleaner – and the sound is better.
Mac doesn’t have any additional ideas about making a better fipple right now, but he may – next time.
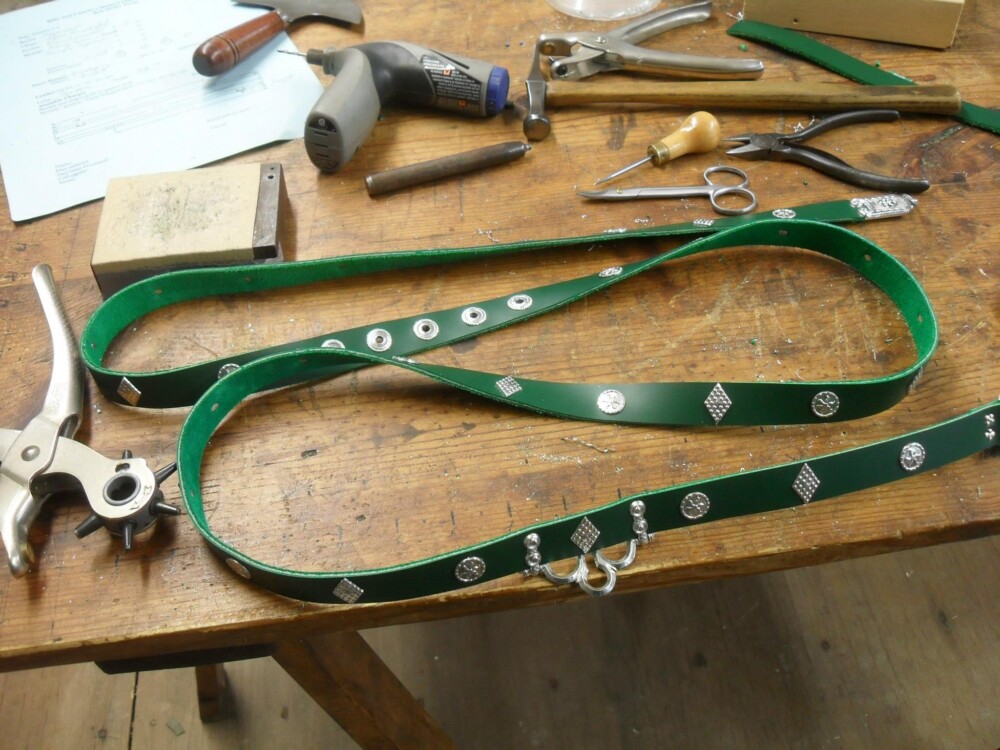
Are you leveling up your appearance with a new belt? We have useful advice on how to make it successfully the first time! This tutorial shows you how we cut the leather, attach buckles, attach chapes, install eyelets, and put in studs. Enjoy – and do write us at billy@billyandcharlie.com if you have a question! We will answer you and improve this post if we see where we should explain something better.
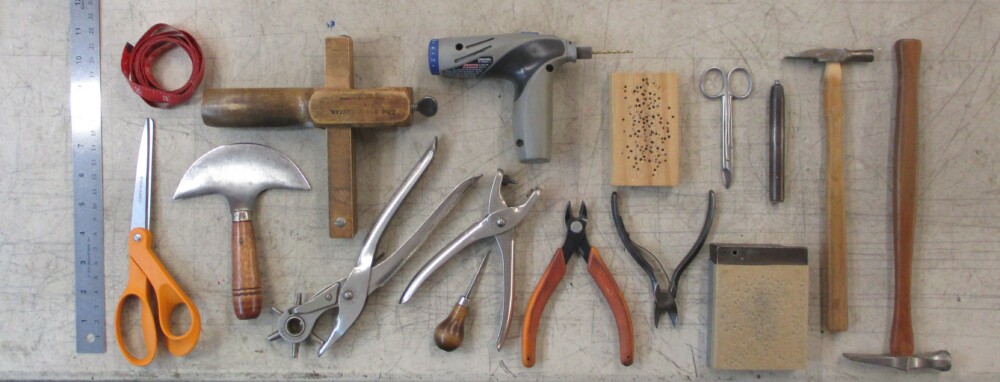
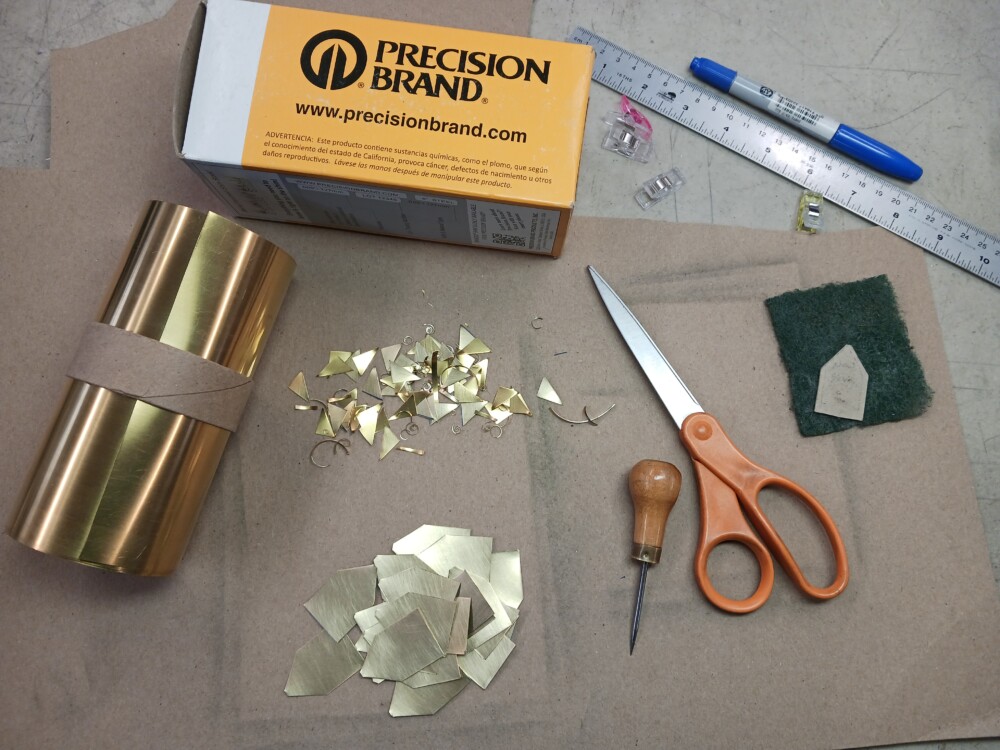
These are the tools we use when making a belt. You may not need all of them and you can substitute/make do for some. From left to right: Ruler, tape measure, scissors, head knife, strap cutter, rotary leather punch, small leather punch, awl, drill, wooden block to drill into, two sorts of rivet cutters (you only need one), fingernail scissors, rivet setter, anvil, cross peen hammer (two examples: the one on the left is the sort you can readily buy at a jewelers supply).
Notes: Our rivets fit in holes drilled with a 3/32″ (2.4 mm) drill bit. Your anvil can be any piece of heavy steel. You should pad it with a piece of cardboard like that on the back of a pad of paper or a notebook cover. Do not use leather or corrugated cardboard as a cushion – they are too soft and many buckles and studs will deform in riveting.
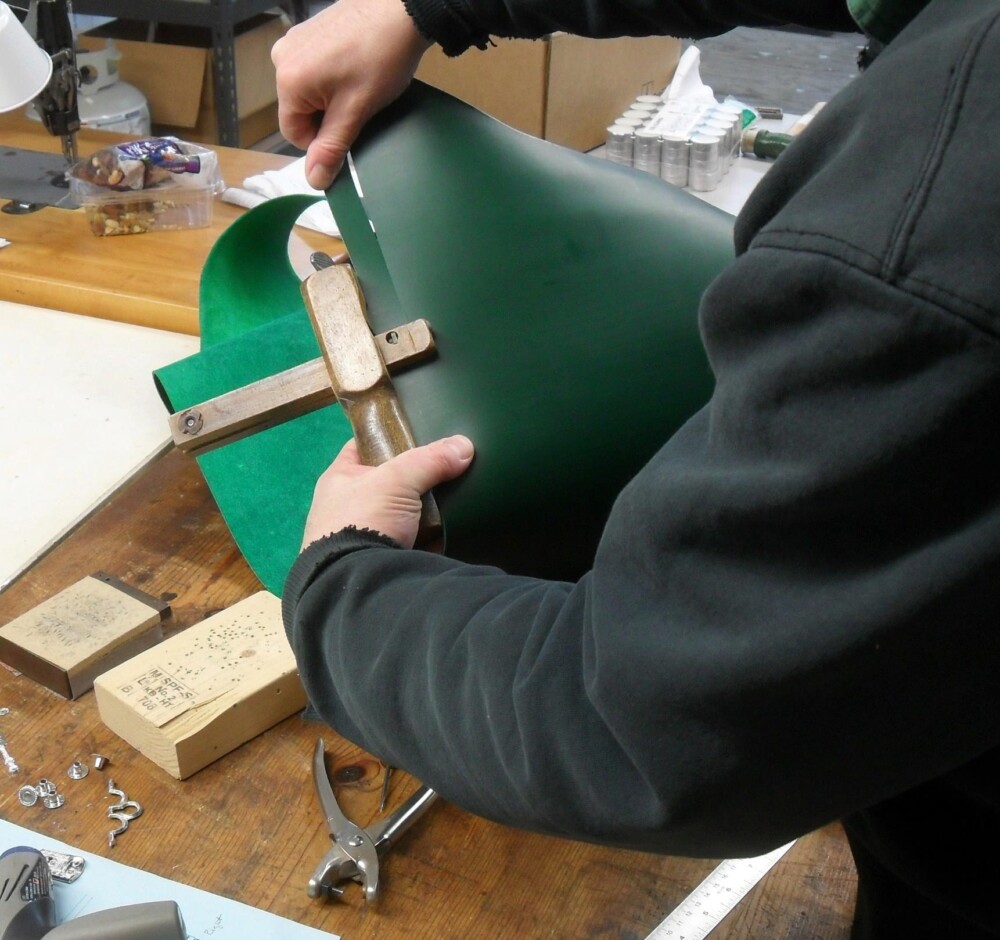
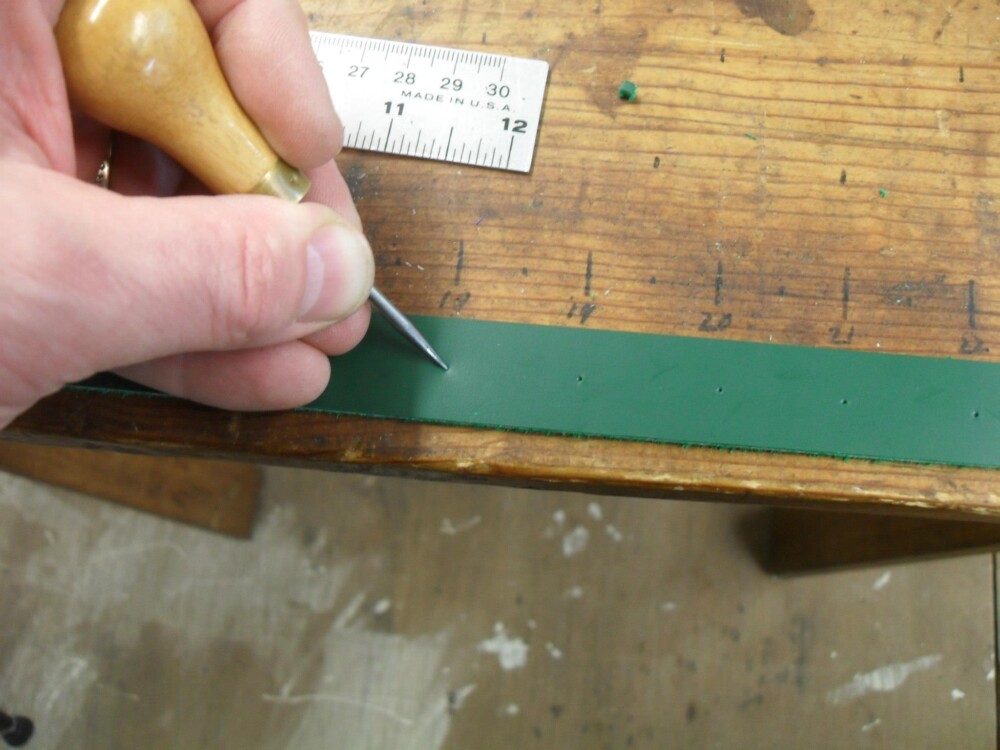
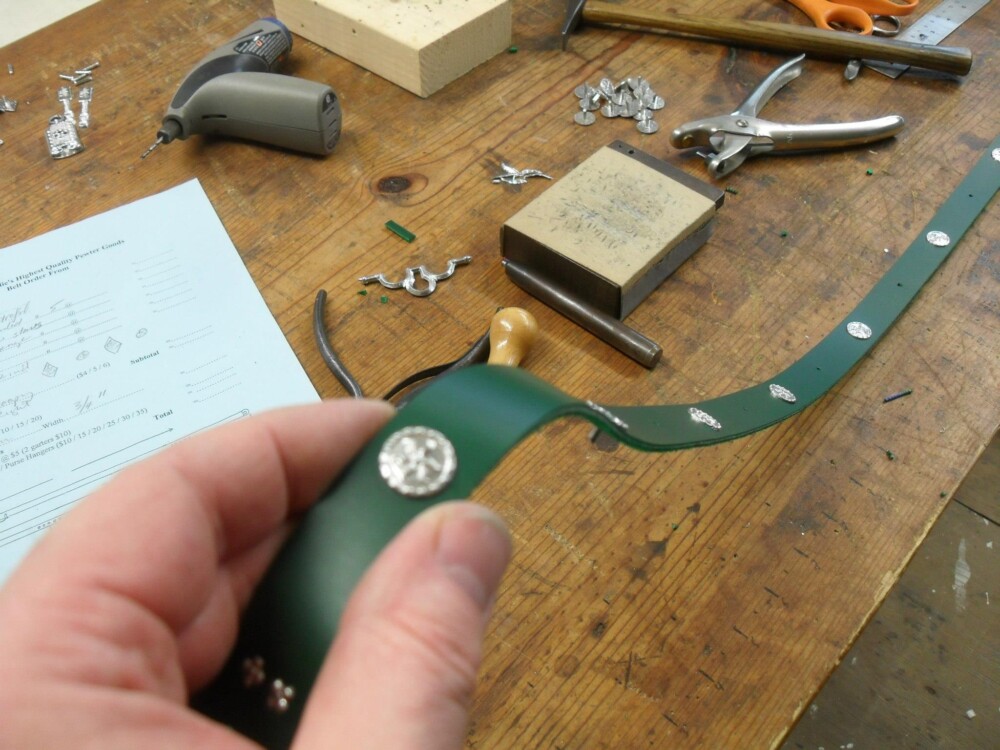
Because we make a lot of belts, we use a standard form to make sure we don’t forget anything. When you make your belt, you should plan it entirely before you even cut the leather – how far the eyelets will be from the buckle, how long a tail you will have, the spacing of any studs. If it is at all complex, we recommend working it out on a large piece of paper at full scale ahead of time.
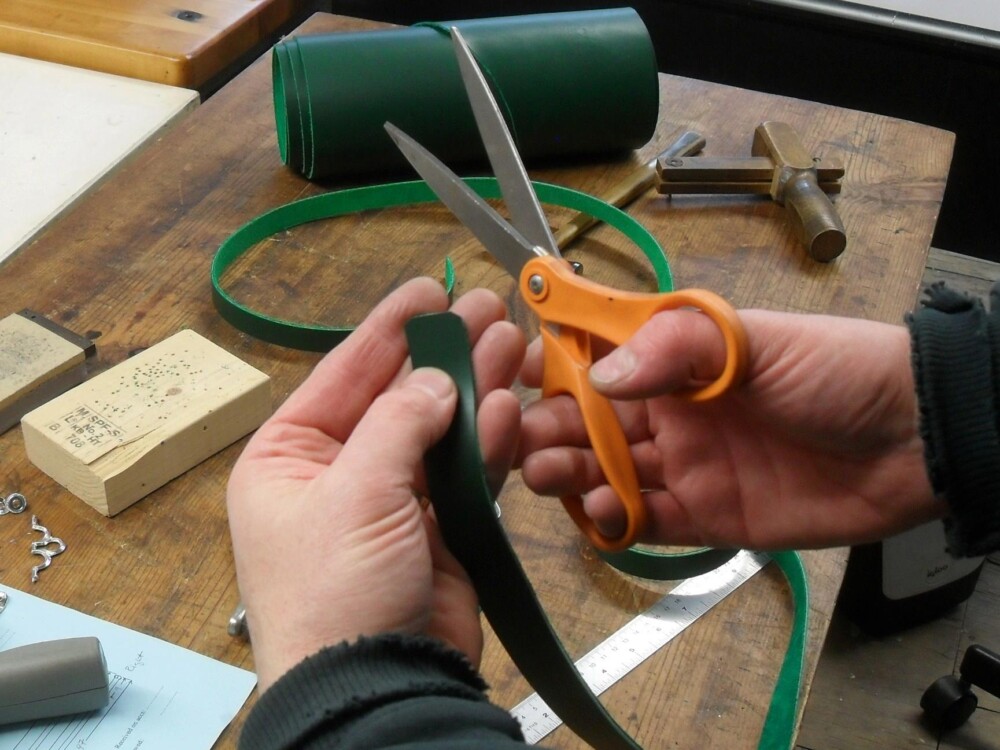
We measure the strap width….. ….and measure it a second time against the strap cutter…… …. because we only want to cut once. All of our buckles and chapes have information on the product page about the width of strap they take, but it is best to check physically to get the precise measurement.
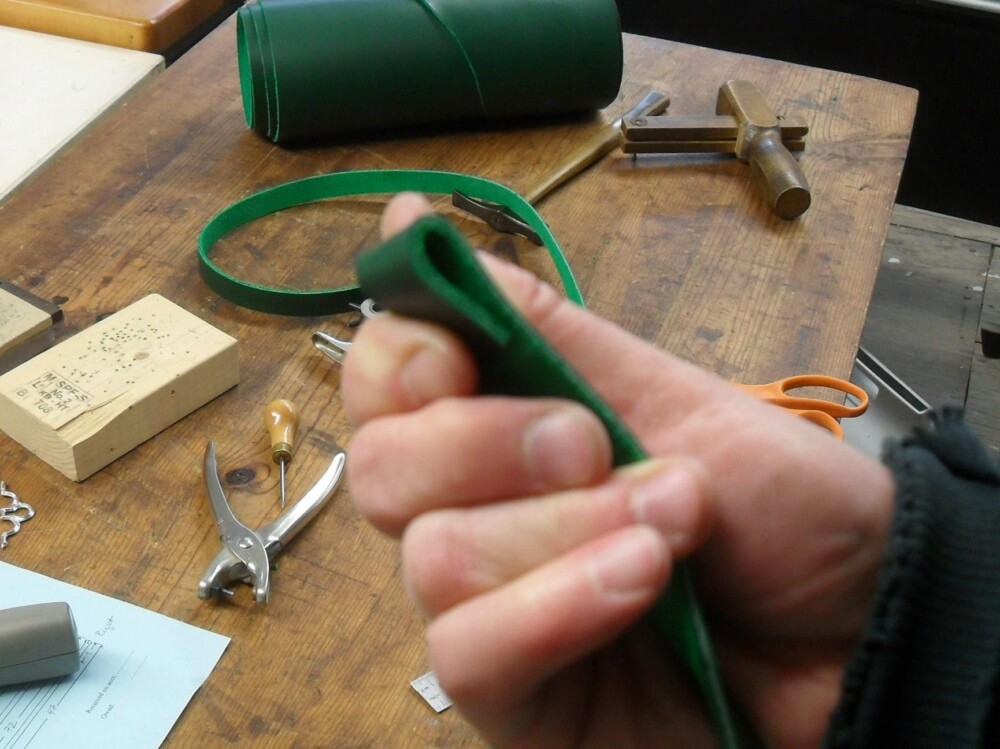
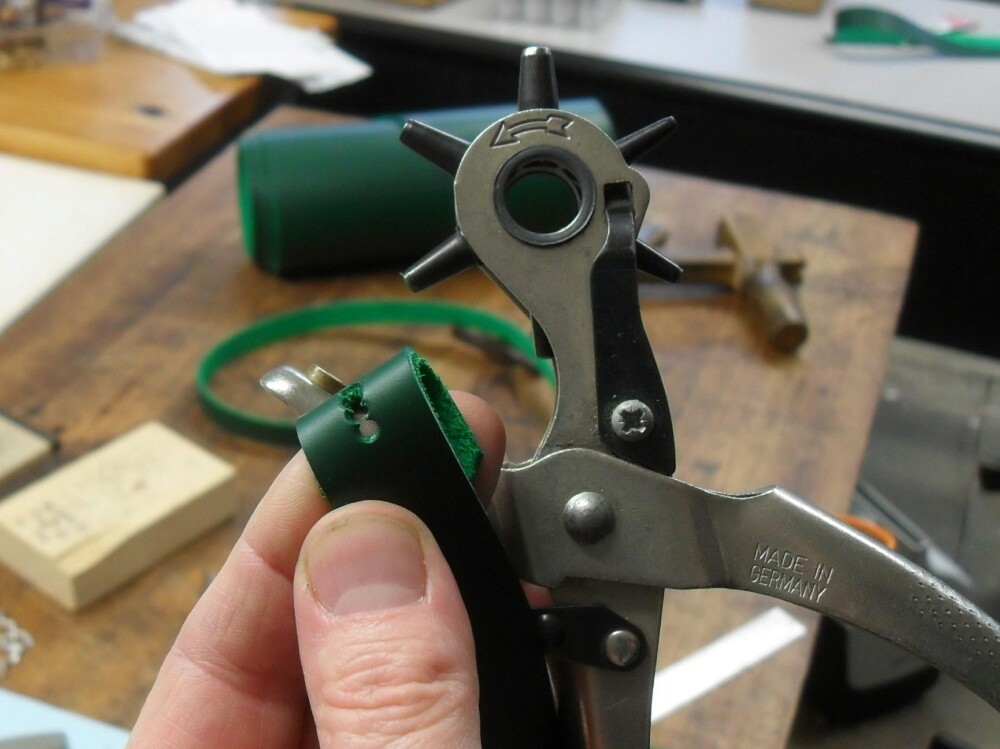
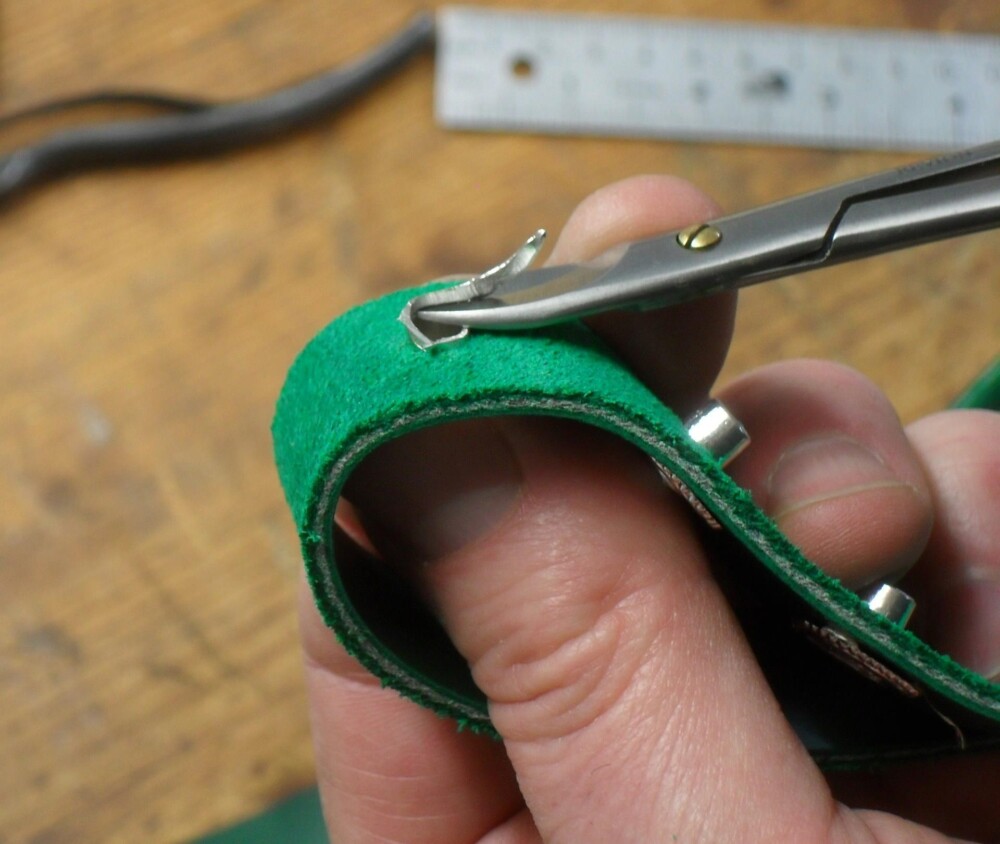
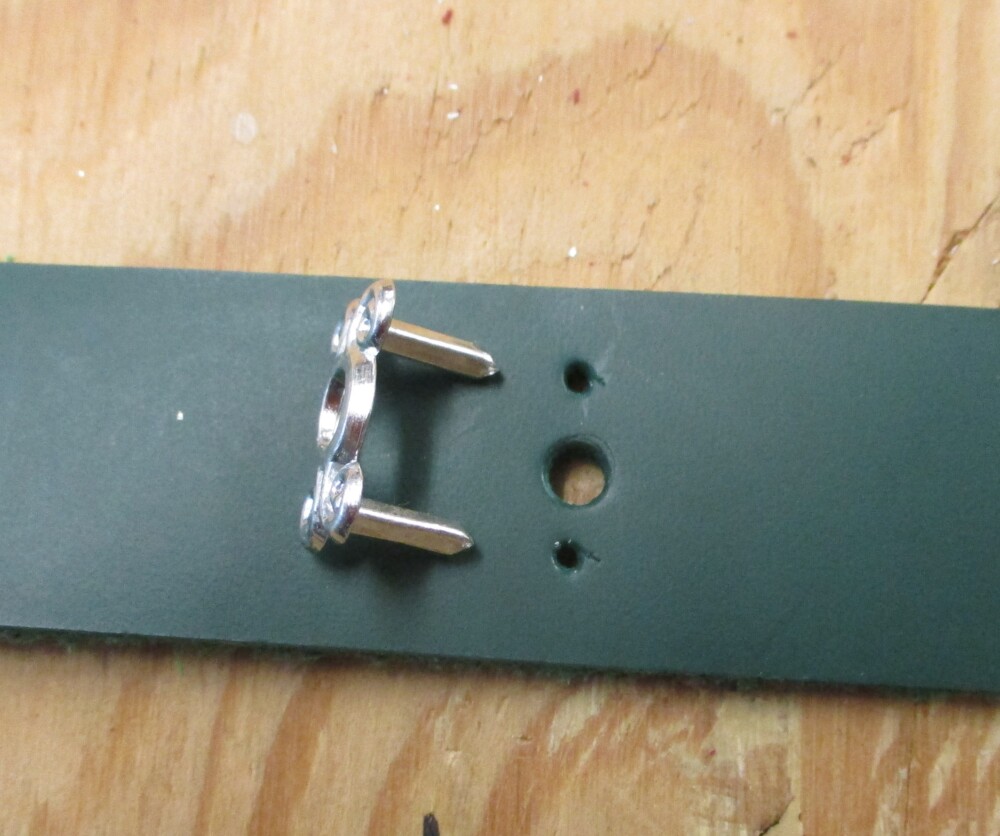
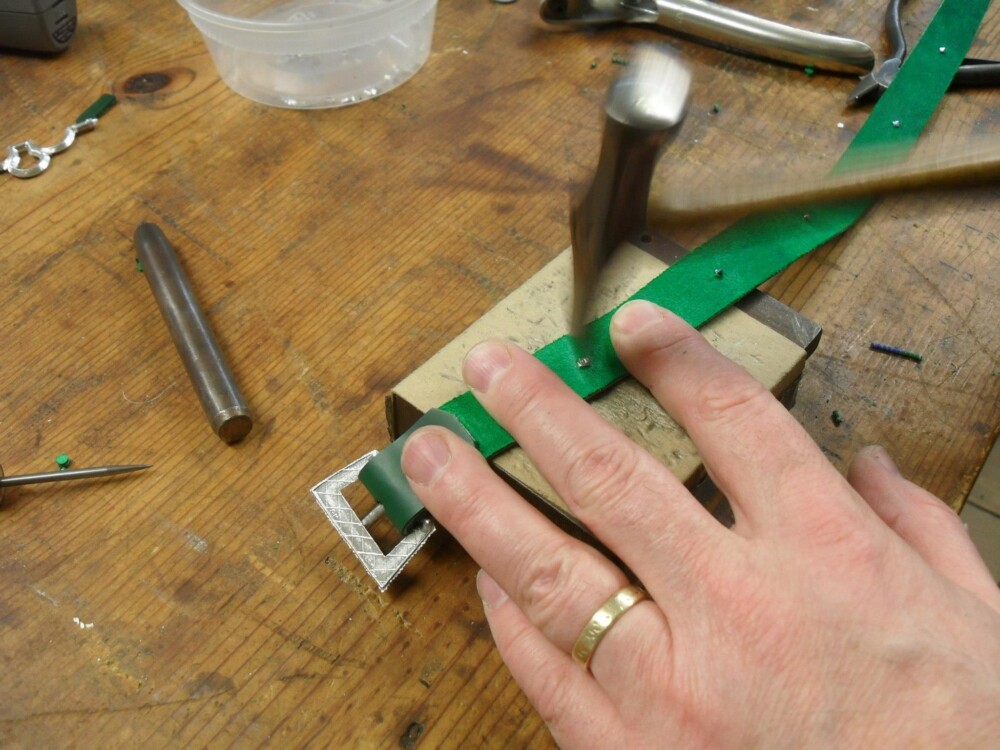
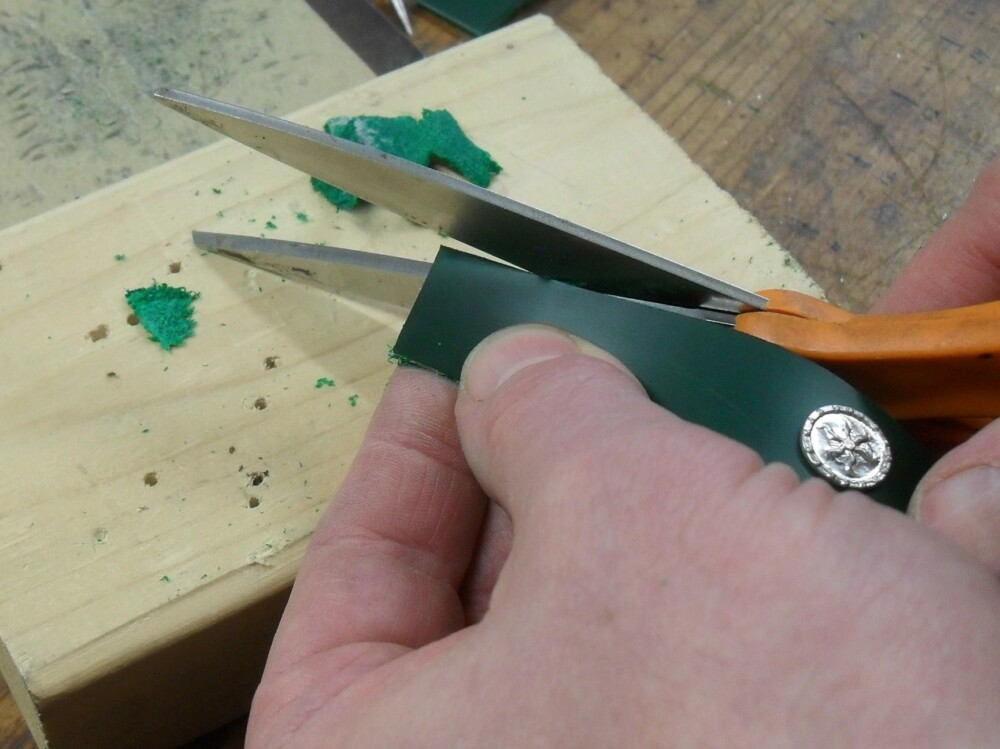
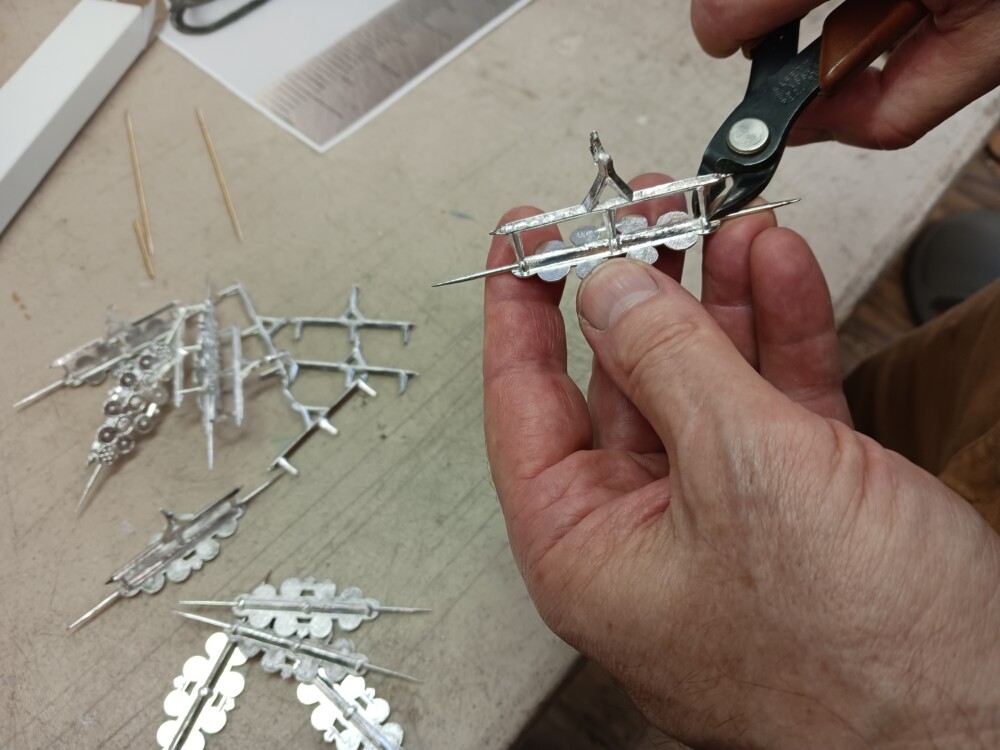
Attaching the buckle. Mac nicks off the corners of the strap so it will be neat. For this buckle, the strap is going to loop through… … at the point where Mac is folding the leather. (Buckles that have openings the strap plugs into are installed like the chape shown below.) Our buckles and chapes are sized like medieval originals, so the leather that fits them is lighter than the heavy leather you may see people using for belts – 5 or 6 or 7 ounce, which translates to 3/32″ to 1/8″ thick (2.4-2.8 mm). If you have a leather that is too heavy you can thin it out with a splitter if you have one. (This is not shown, because we do not stock very heavy leather and it is not part of our normal procedure.)
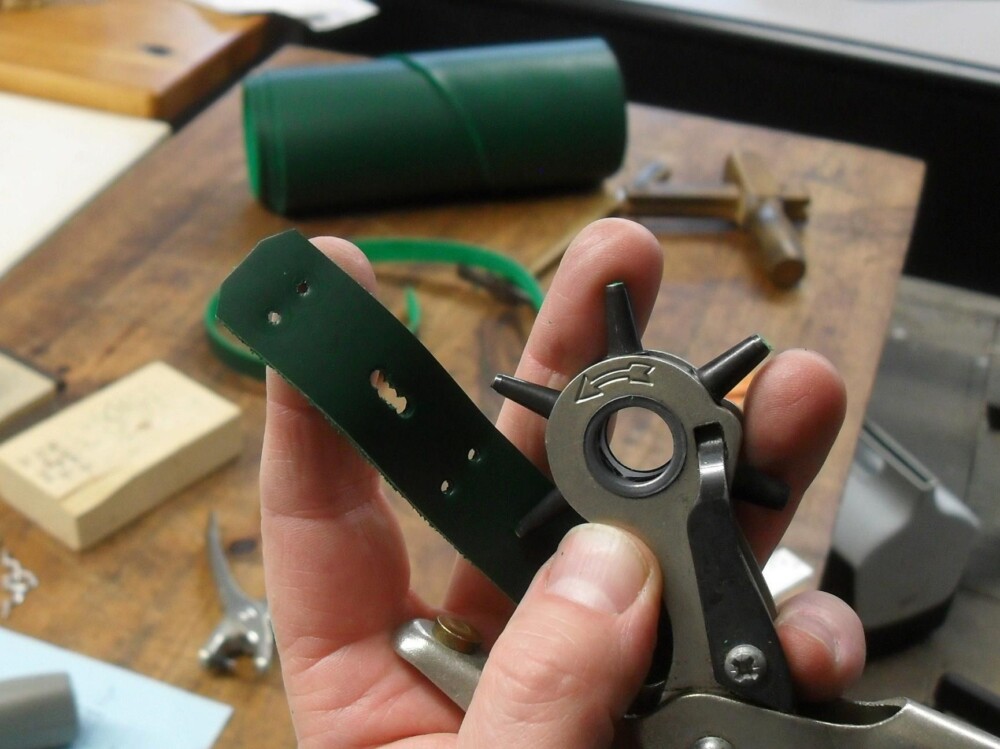
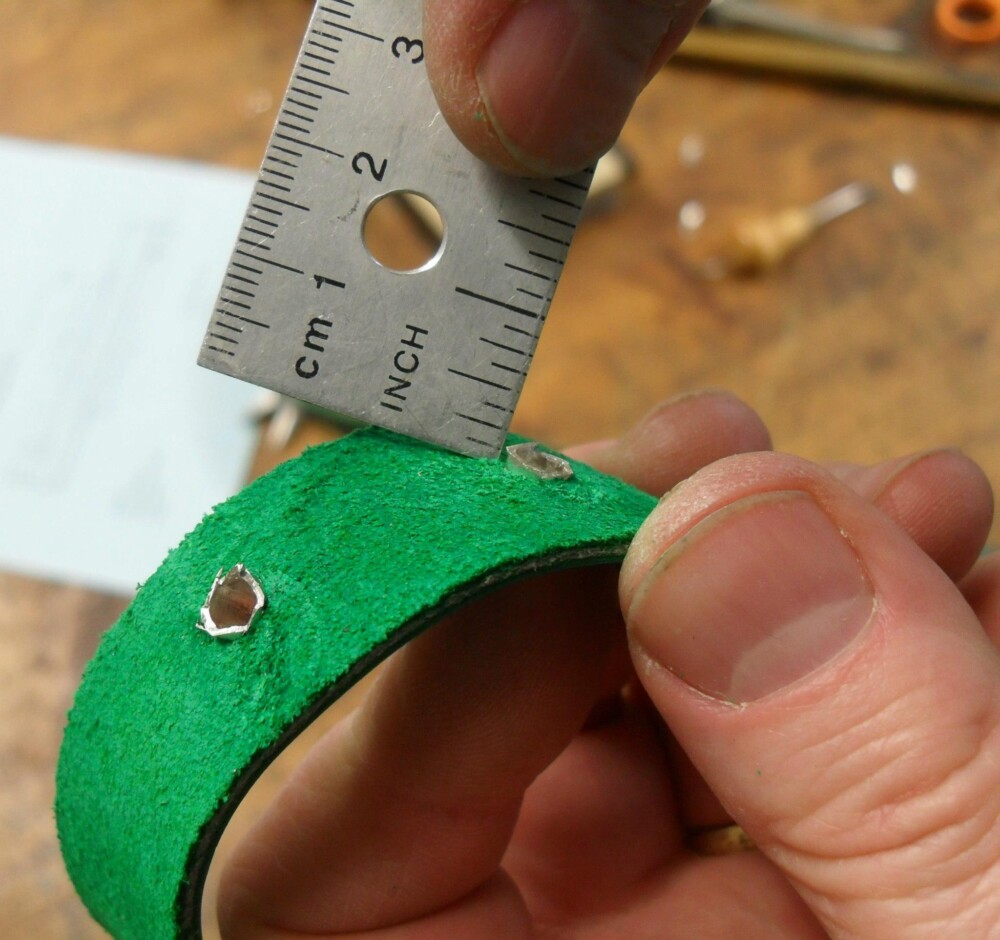
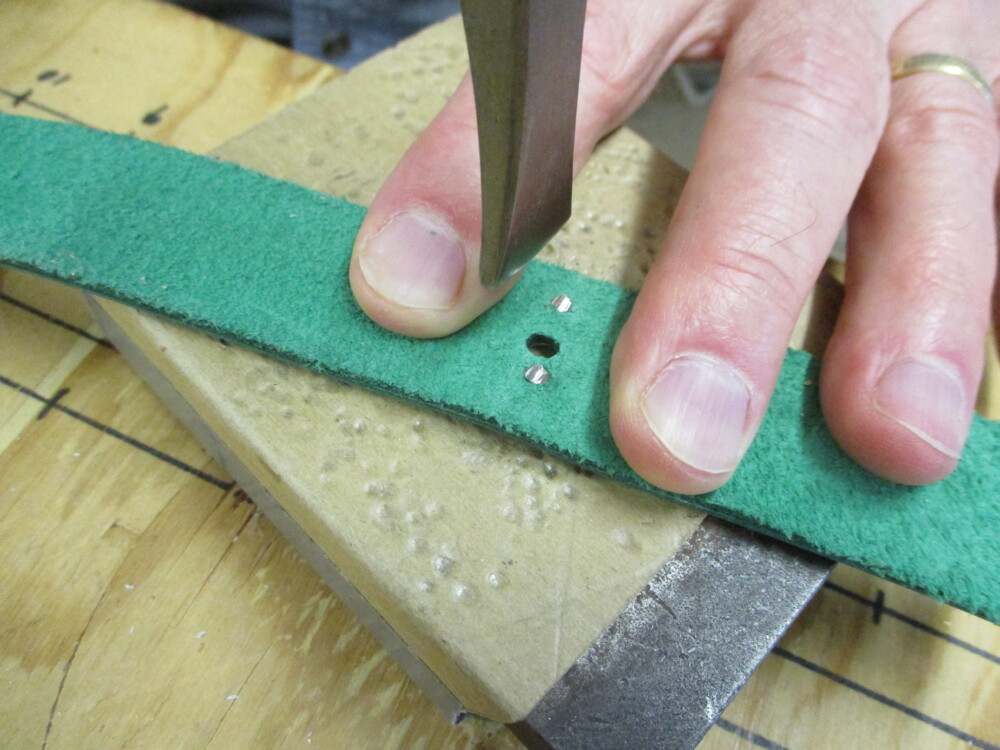
We use a rotary leather punch to make the hole the buckle tongue will go through, and extend the hole with additional punch “bites” along the top of the strap, so the tongue can move freely in the slot. If you have specialized leather-working tools, you may have a slot punch that cuts out a long straight sided hole, but you can make do with just a rotary punch as we do. While the strap was folded, Mac punched the holes for the rivets also, using the small leather punch. These must be small enough that the rivet has to be pushed pretty hard to fit in. Use an awl if your punch is too large.
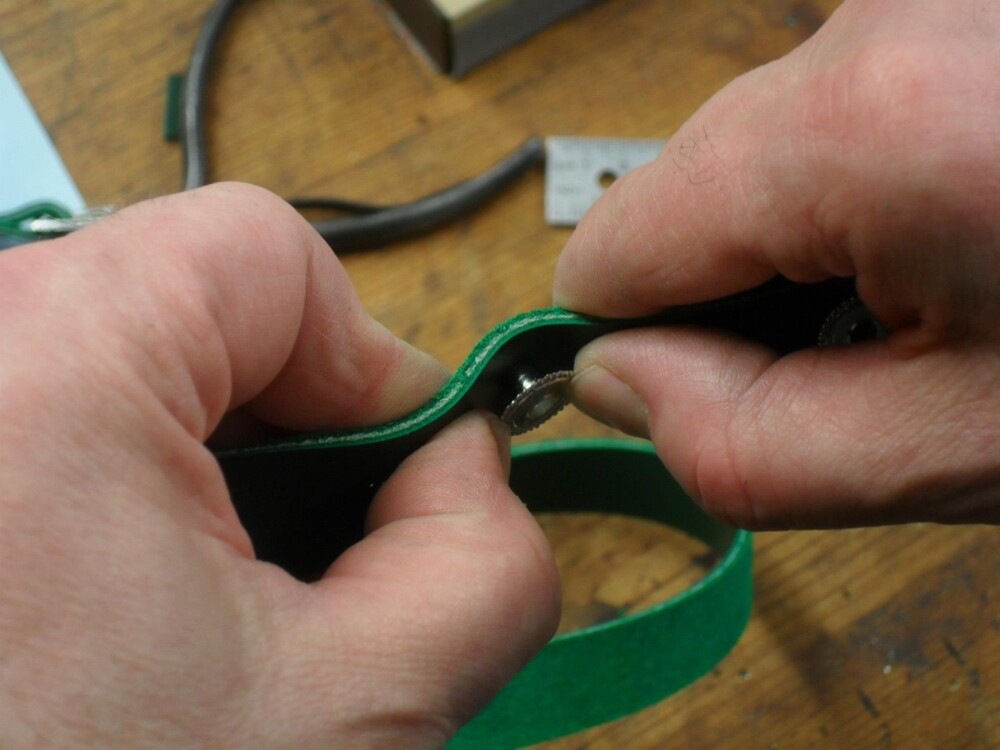
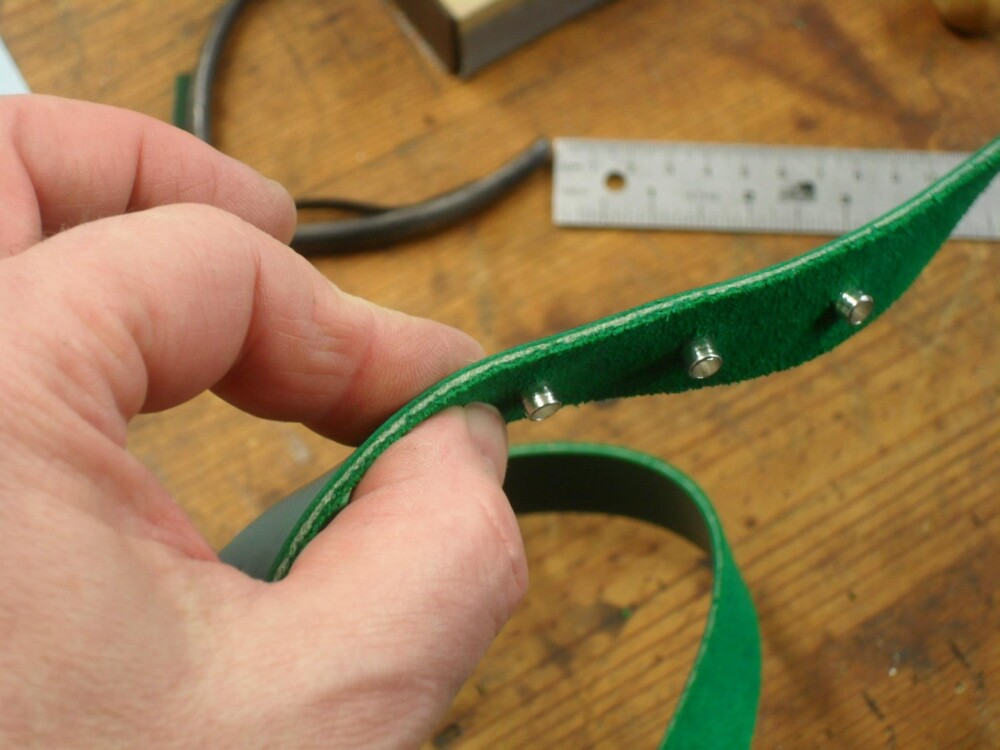
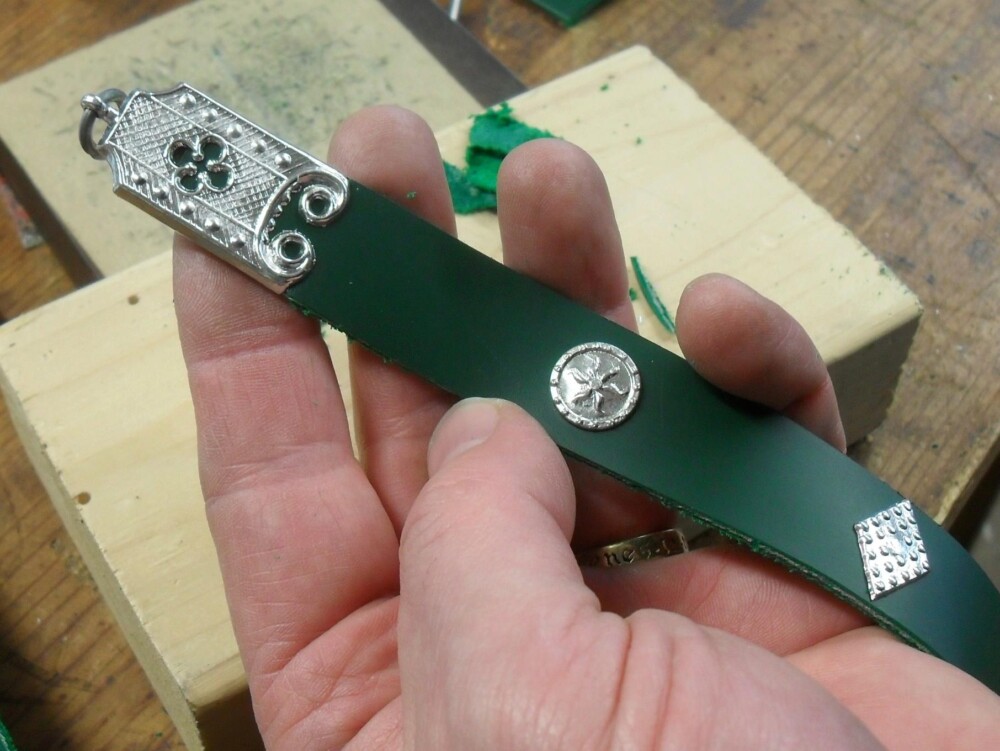
The rivets put through the holes. The heads of these rivets are larger than the holes we punched for them, but they need something broad on the back also to be strong, so we use washers/roves to peen them up against. The rivet is cut quite short, then peened up with a riveting hammer and a dozen or twenty little taps. For a more complete description of how to spread the metal of the rivet out over the washers, check out either our blog post, Getting Crafty with Billy and Charlie: Belt Studs, or our post Attaching a Nick Rolin Chape.
Buckles with sockets the leather fits into are put on in the same way as chapes – see below.
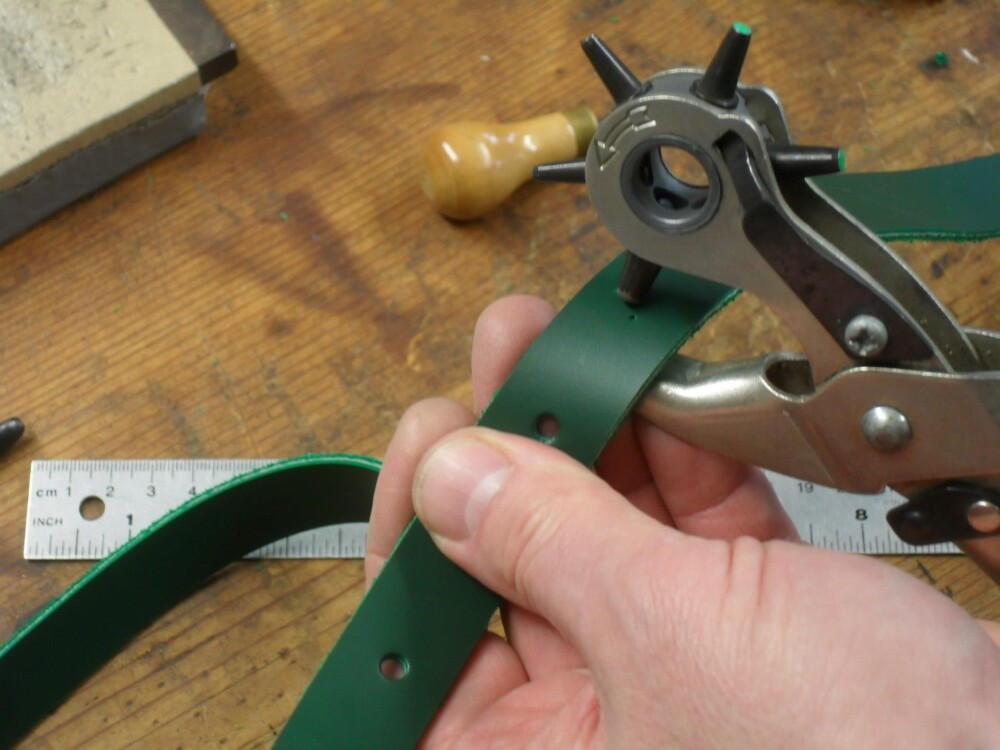
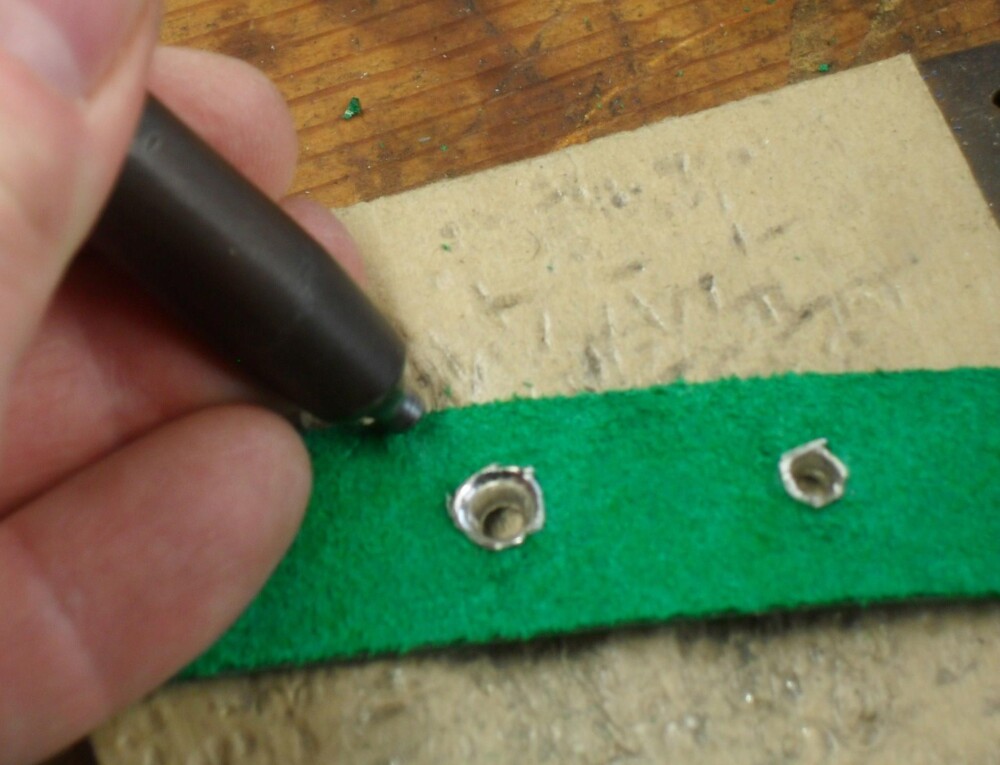
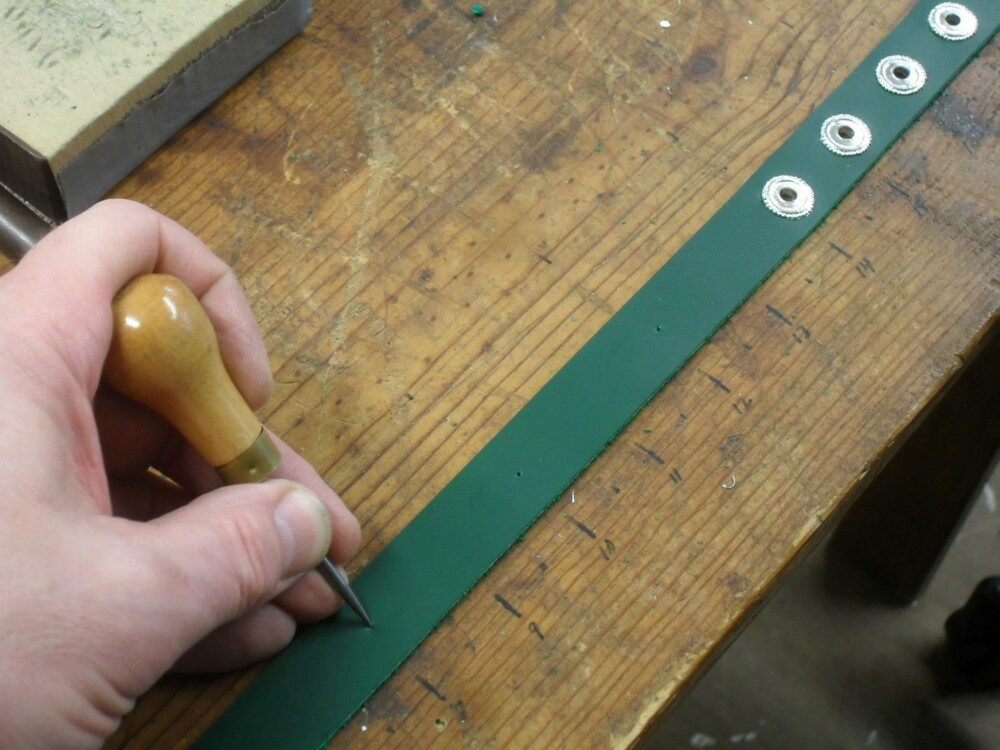
We strongly recommend using eyelets to protect the leather from the tongue of the buckle (and our standard suggestion is to put one eyelet at the length you want to wear the belt and two more to either side). Here we show how to install tube eyelets that pass through the belt and are hammered to spread and smooth them. We recommend you lay out the entire belt first, figure out where the eyelets will go, and install them before you put in the studs. We like one inch (25mm) spacing between the eyelets for belts. We usually use an awl to make light marks where we will punch later, but you can use a pencil or pen, etc. Punch holes for the eyelets. The hole should be just vaguely smaller than the eyelet “tube”… …. so it needs to be pressed hard to go in.
The tubes are almost always too long to open up neatly… …. so Mac trims them back. The neater the edge, the better the result will be, and when we are working at home, we usually take the eyelets and strap to a grinder and level the cuts, but a fingernail scissors will do an adequate job. If you are meticulous, you could use a file to level them out.
Very little of the tube should protrude after trimming. We use a rivet setter to open the eyelet tube and spread it out. You can substitute any rounded steel object that you can hold and tap with a hammer. We have used the ball of a ball peen hammer driven with a leather mallet, and even a center punch. You really just need to get the top of the tube starting to spread open.
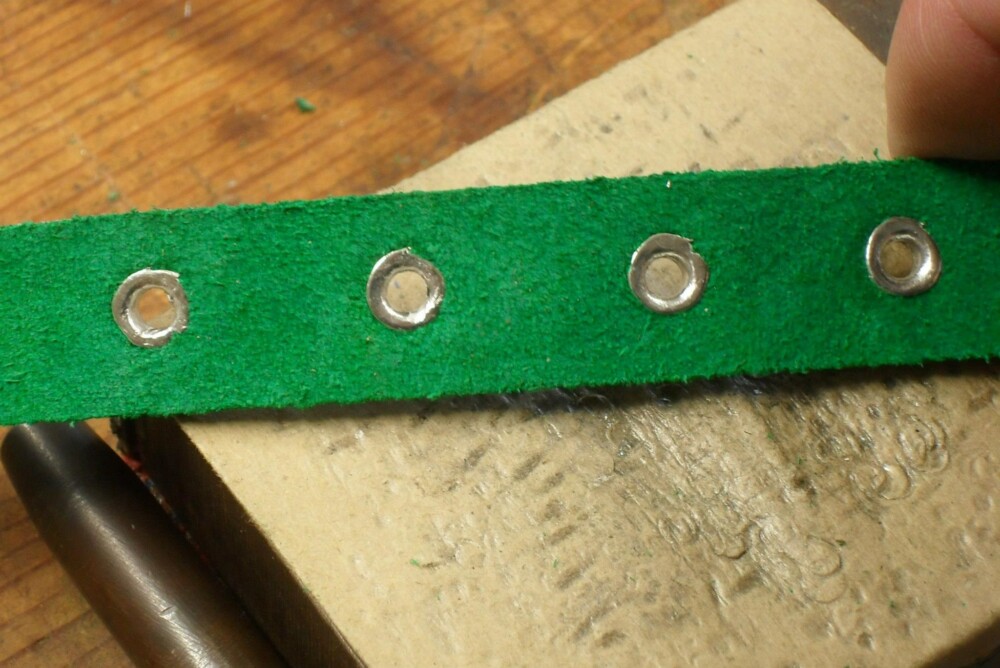
Finish spreading and smoothing the eyelet tube with the flat face of a small hammer. These eyelets are finished. Because we spread them without grinding them level, some of the rivet tubes split on the back. As long as the tube itself does not split these will function perfectly. You do want to make sure all the edges are pressed down into the leather and that they will not catch on the wearer’s clothing.
We also have eyelets that sit on the surface of the belt and which are attached with integral pins. Punch the central hole and the pin locations. Put the pins through, cut them off close, and peen them up like rivets or mounts, being sure to spread out the metal on the back.
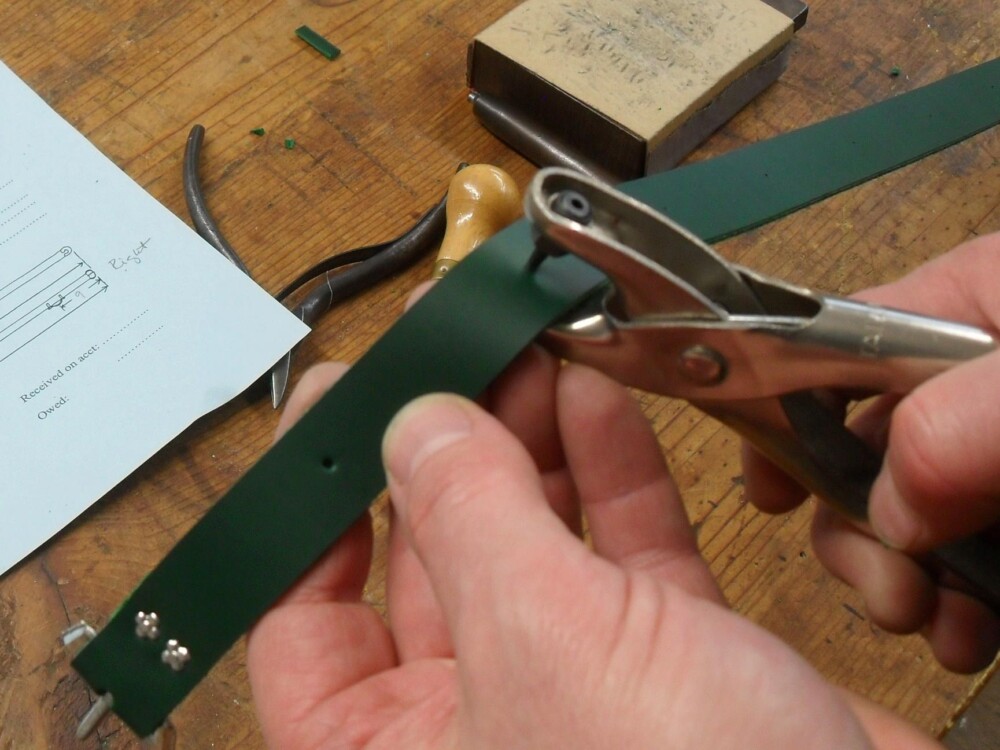
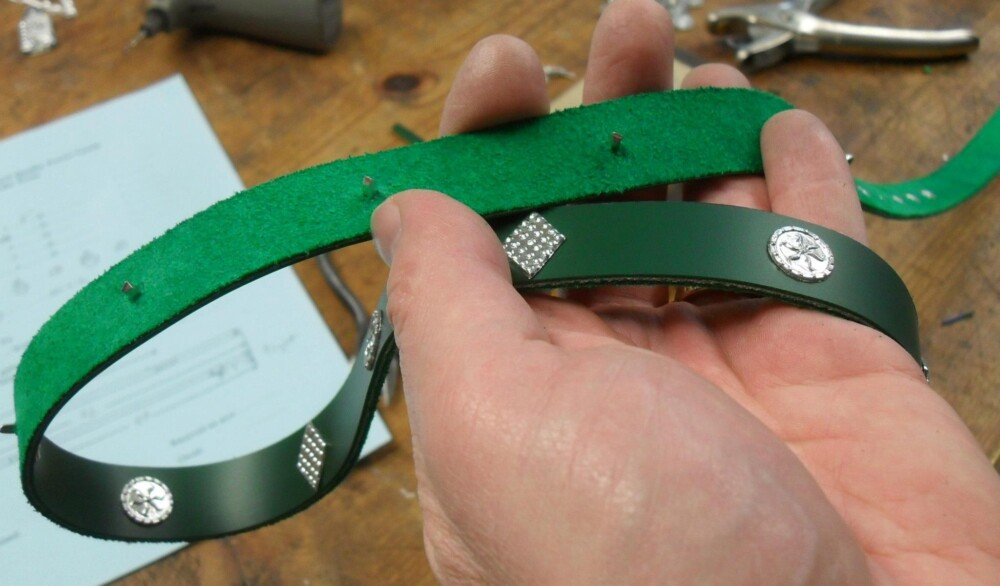
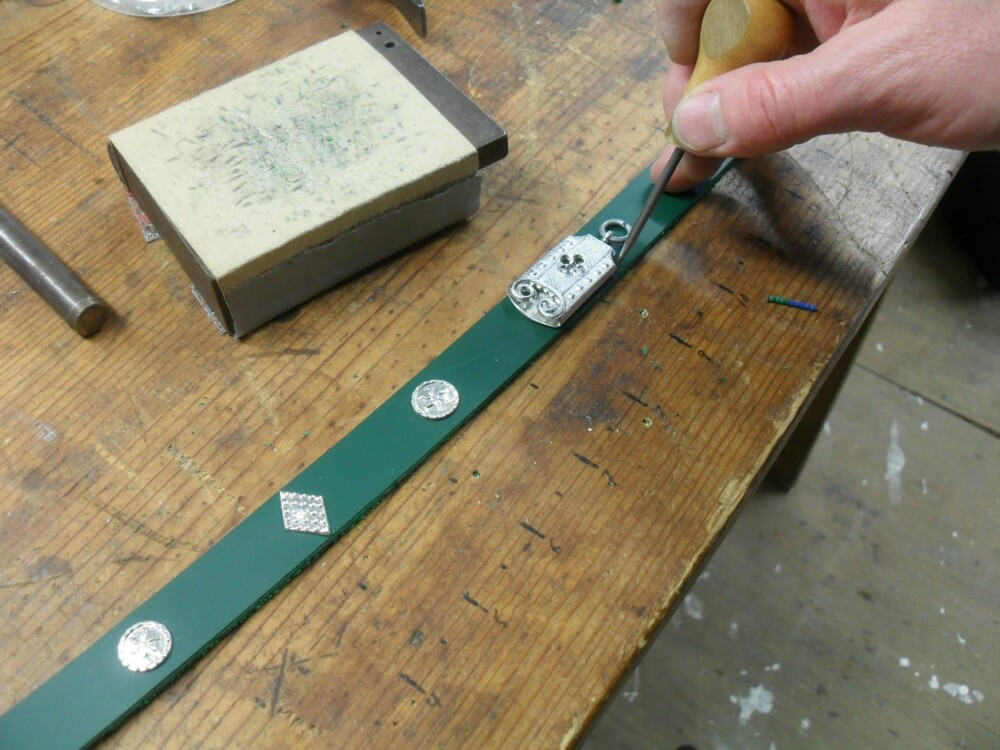
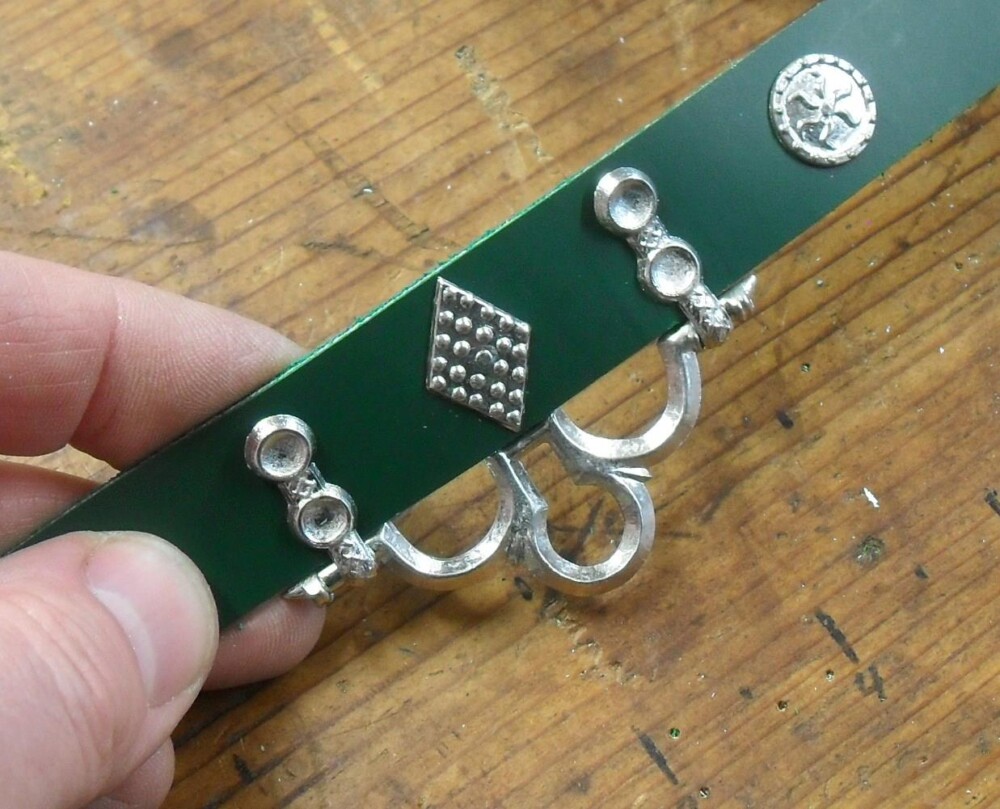
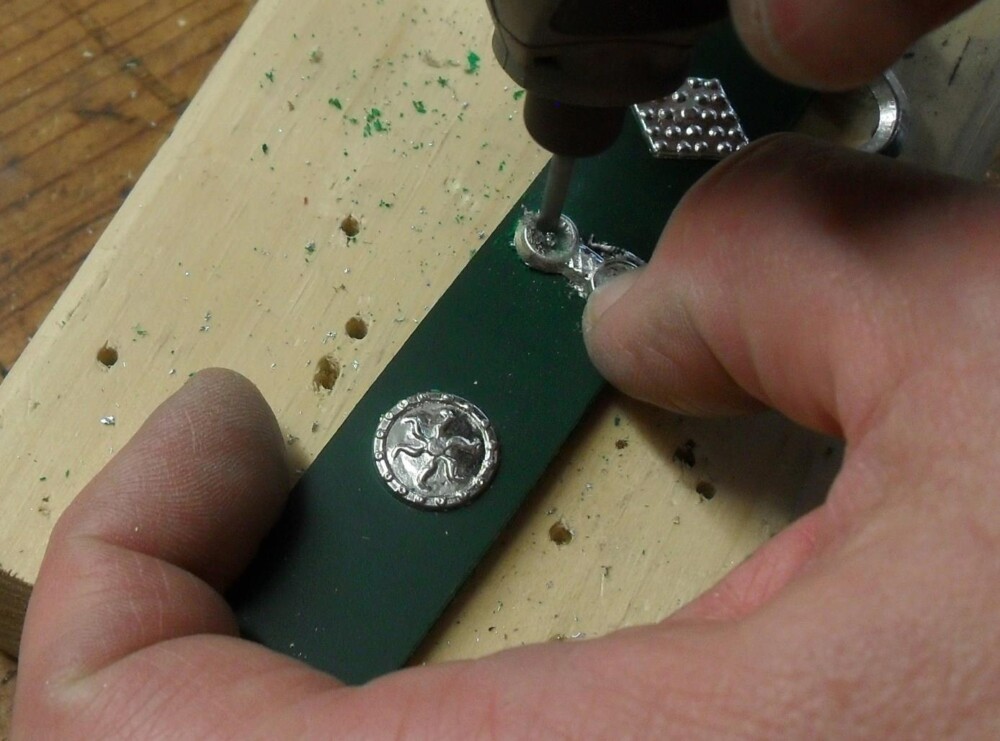
Marking the spacing for studs. Extant straps from the Middle Ages we have seen show spacings ranging from 3/4 of an inch to 3 or 4 inches (2 to10 cm) apart. It is a matter of taste – although as sellers of pewter we prefer to see them closely set. 😊 In any case, choose an easy-to-measure distance and apply it to the entire belt. (Do not guess how many studs you will need, then try to space them evenly. This is a disaster waiting to happen.) As with the rivets or the buckle, the holes for the studs should be the smallest you can force the pin of the stud through. Use your smallest leather punch or an awl.
This belt has alternating studs. Sad experience has taught us to put all the studs of one sort in, leaving holes for the other, and check it over carefully… … before plugging in the second style of stud.
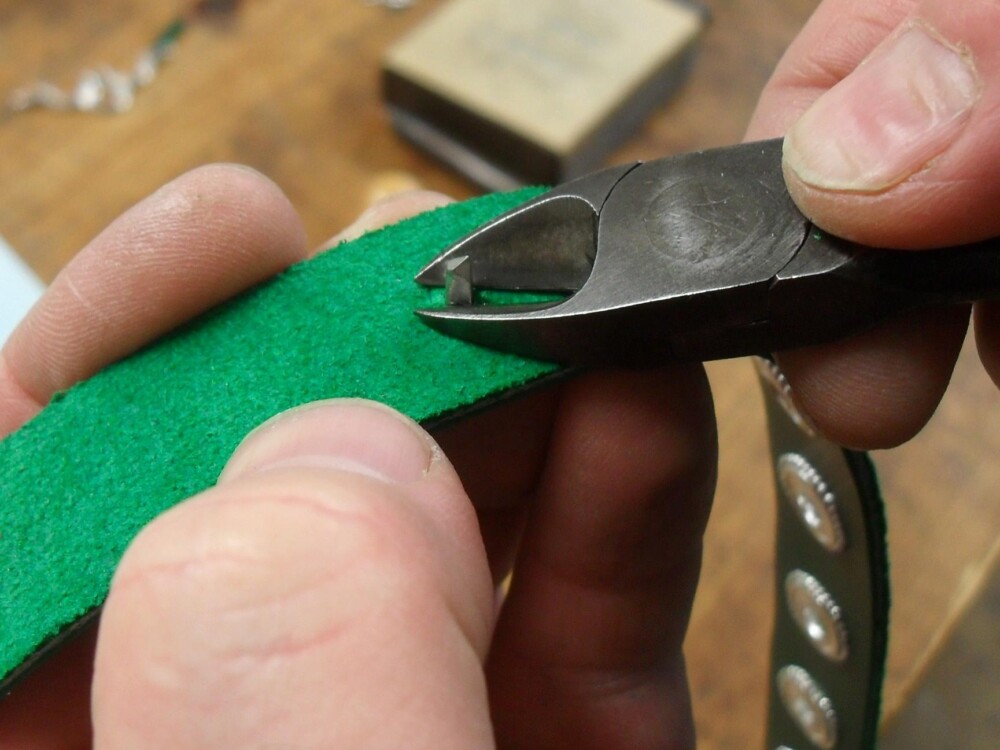
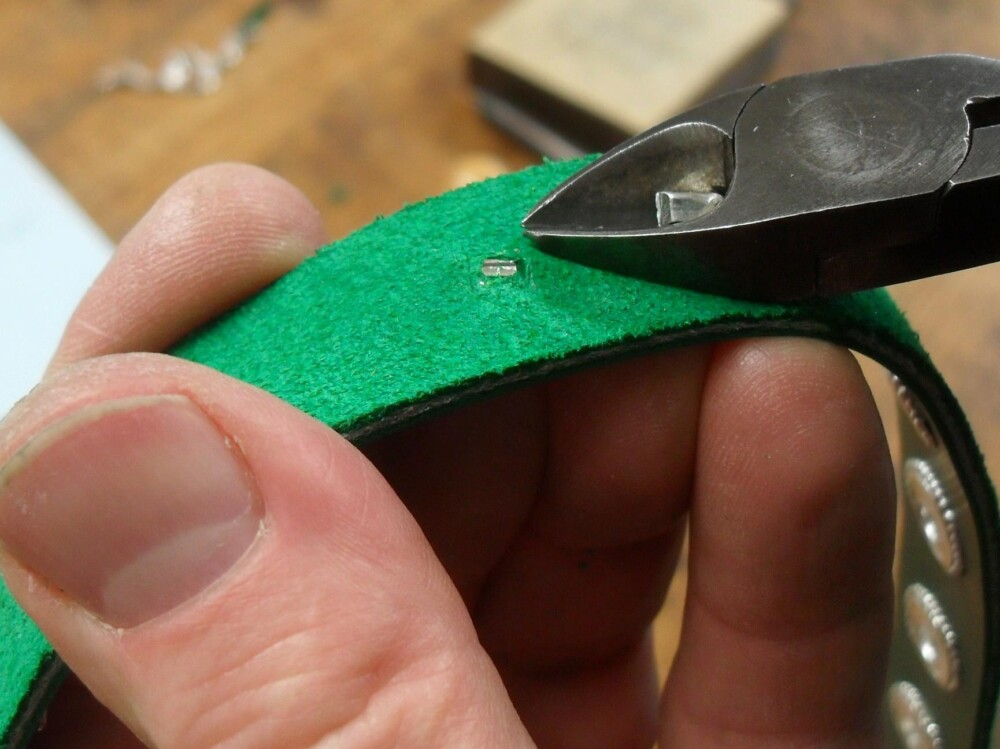
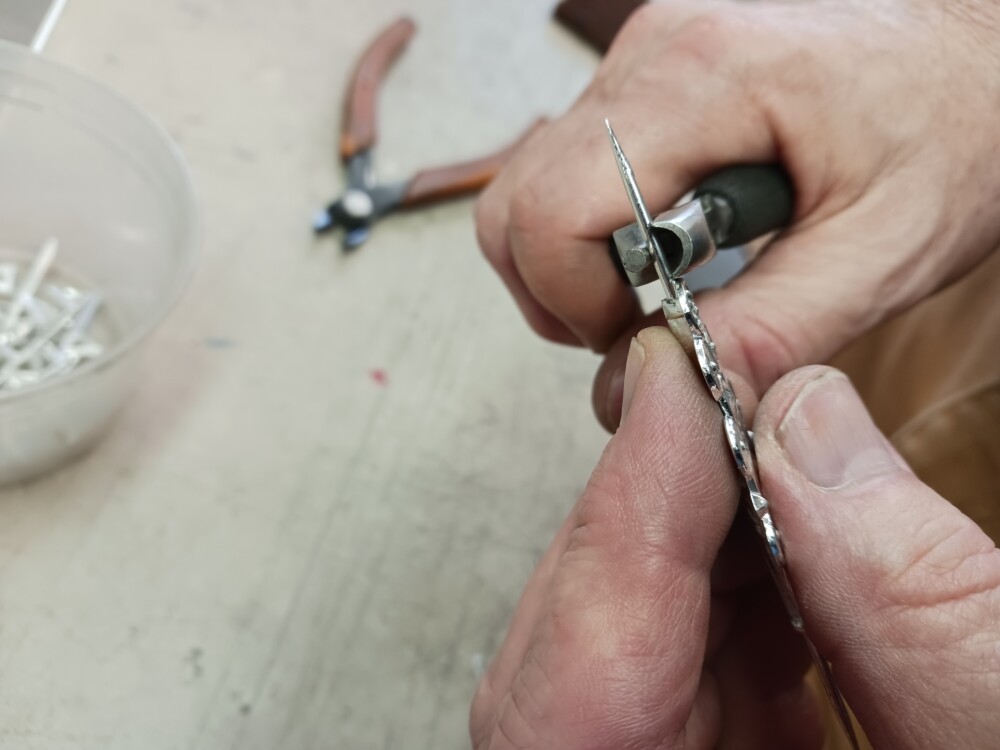
Nip the stud off pretty close – The stud shank/pin that remains should be no taller than its own diameter. Very little is left proud of the surface….. … just enough to spread out cleanly as you set the stud with a small cross peen hammer, riveting as always against an anvil covered with a thin sheet of cardboard. There is no need for washers; a carefully spread out stud shank will keep the decorative piece in place through normal use. Did I mention our blog post, Getting Crafty with Billy and Charlie: Belt Studs?
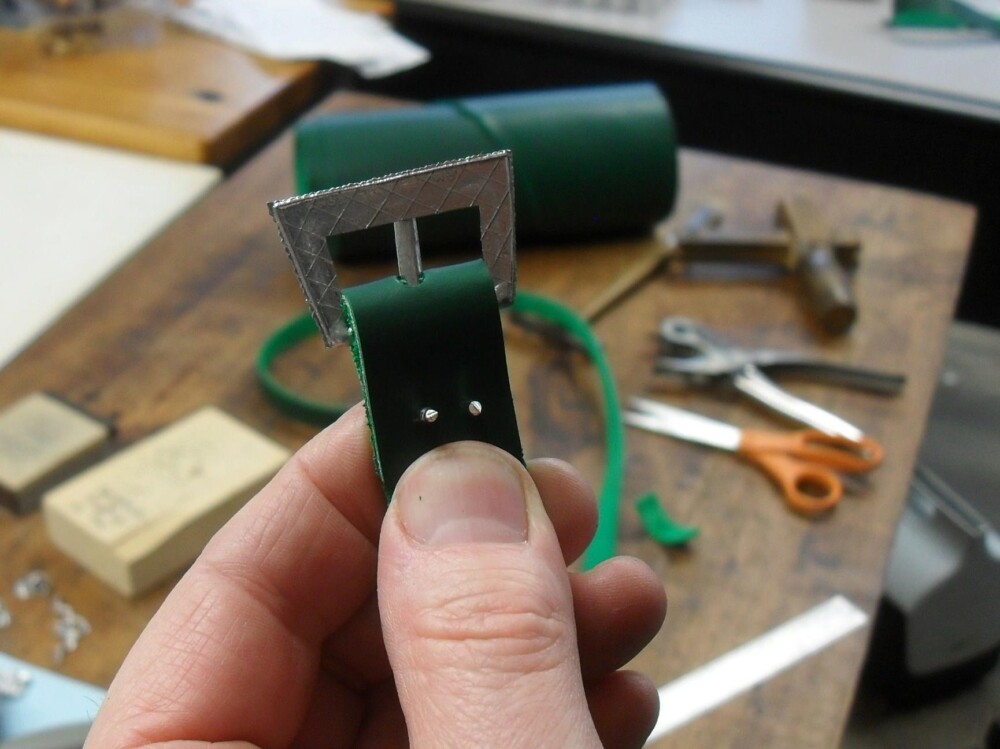
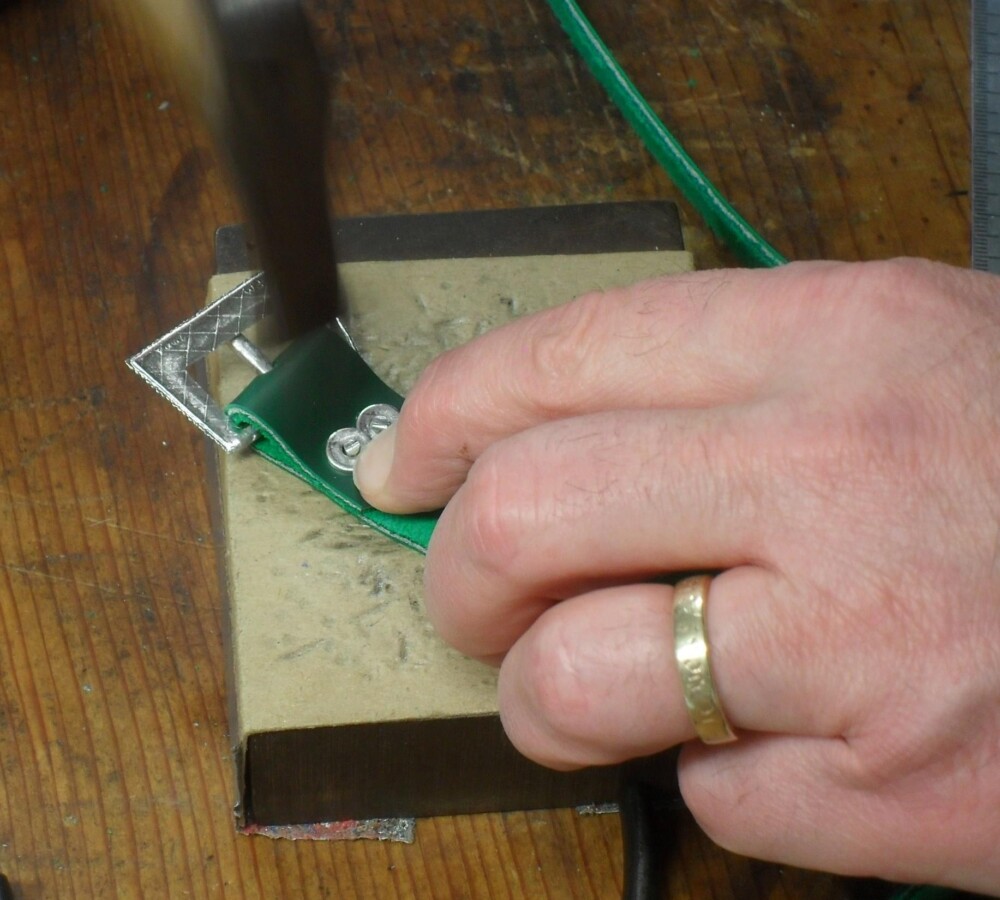
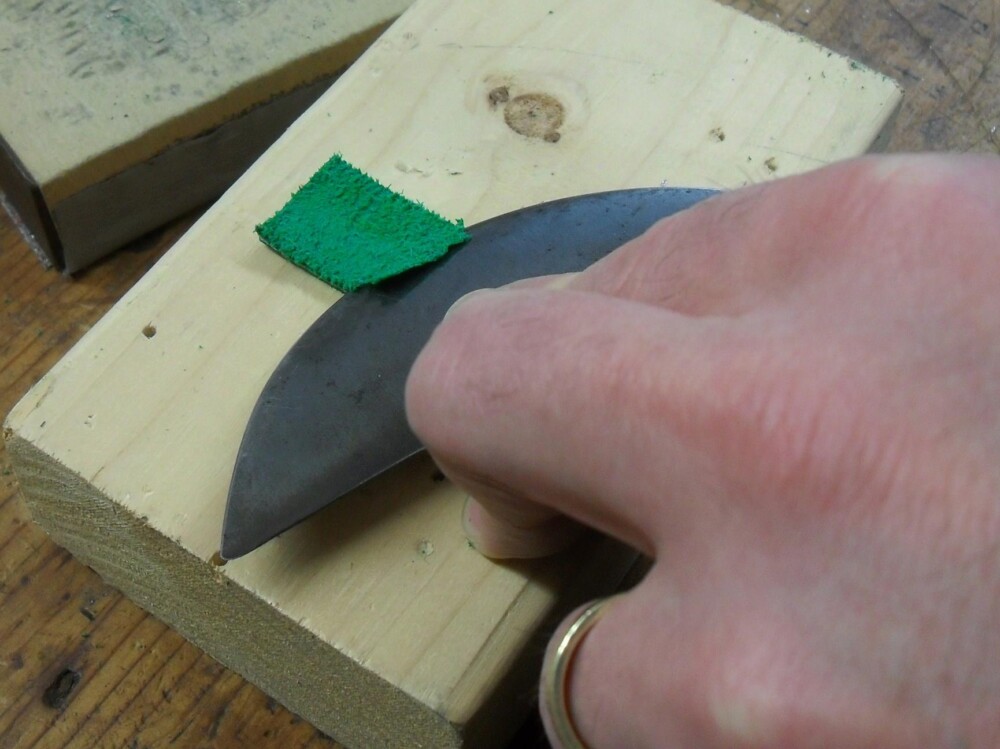
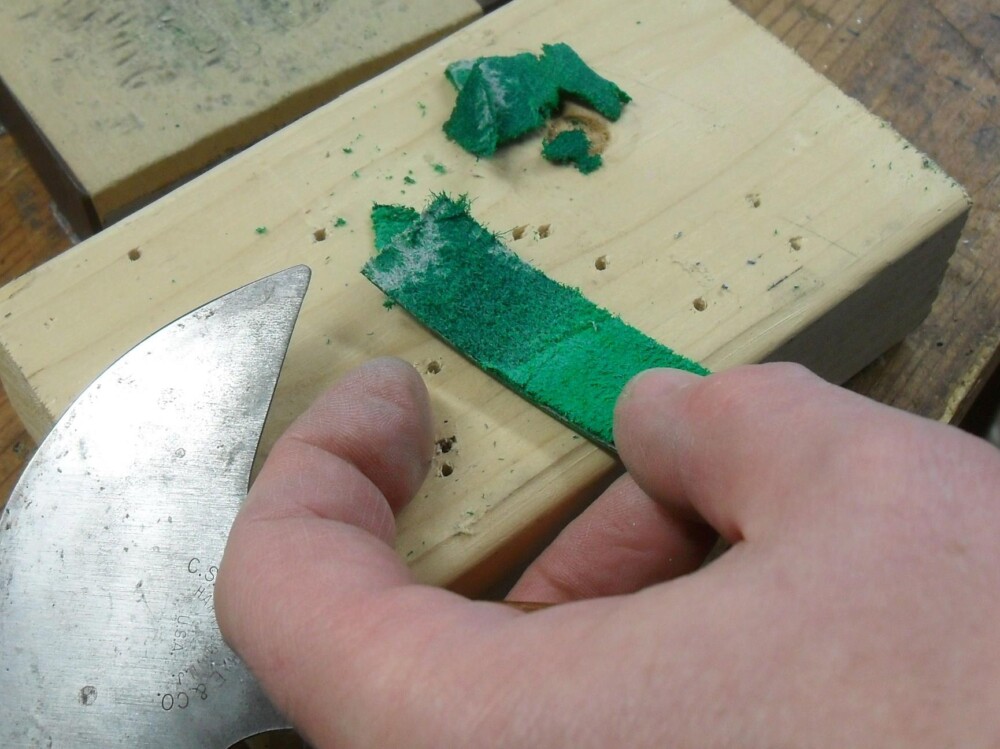
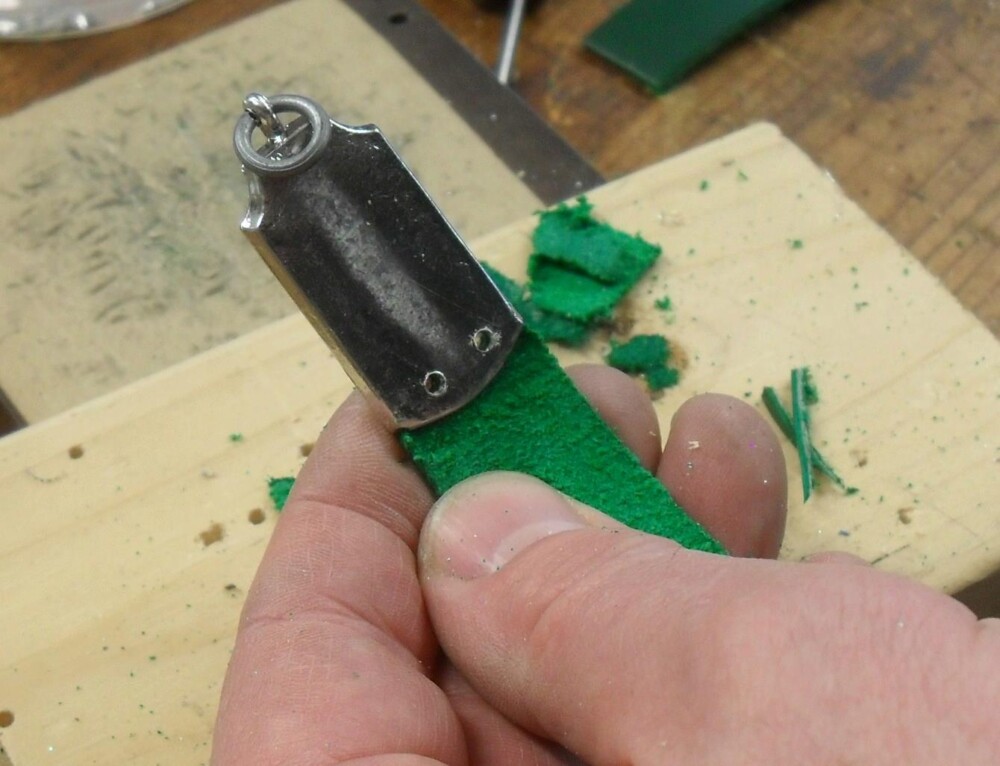
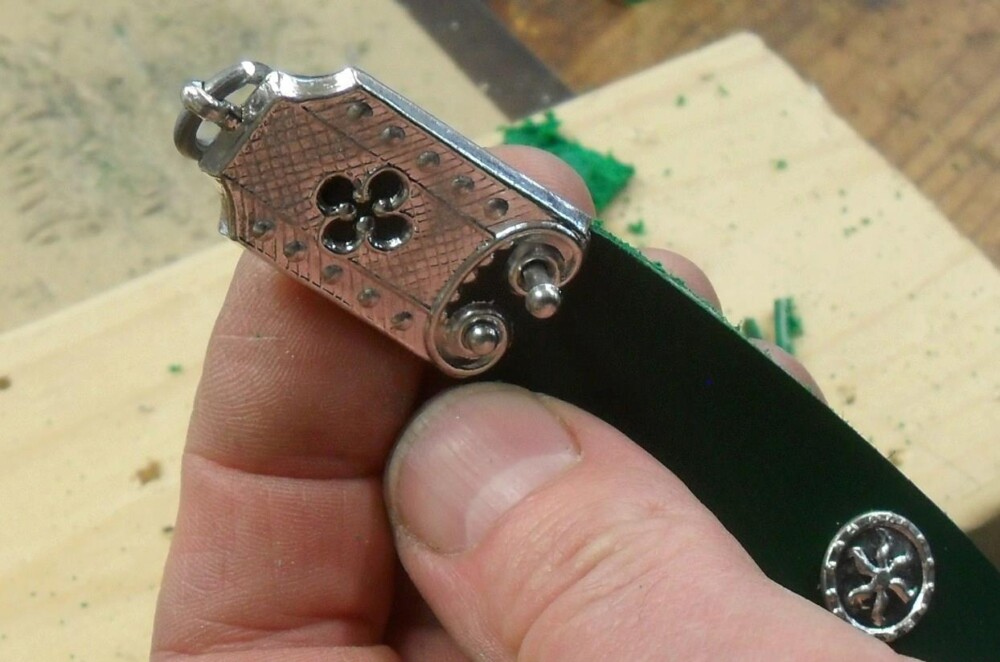
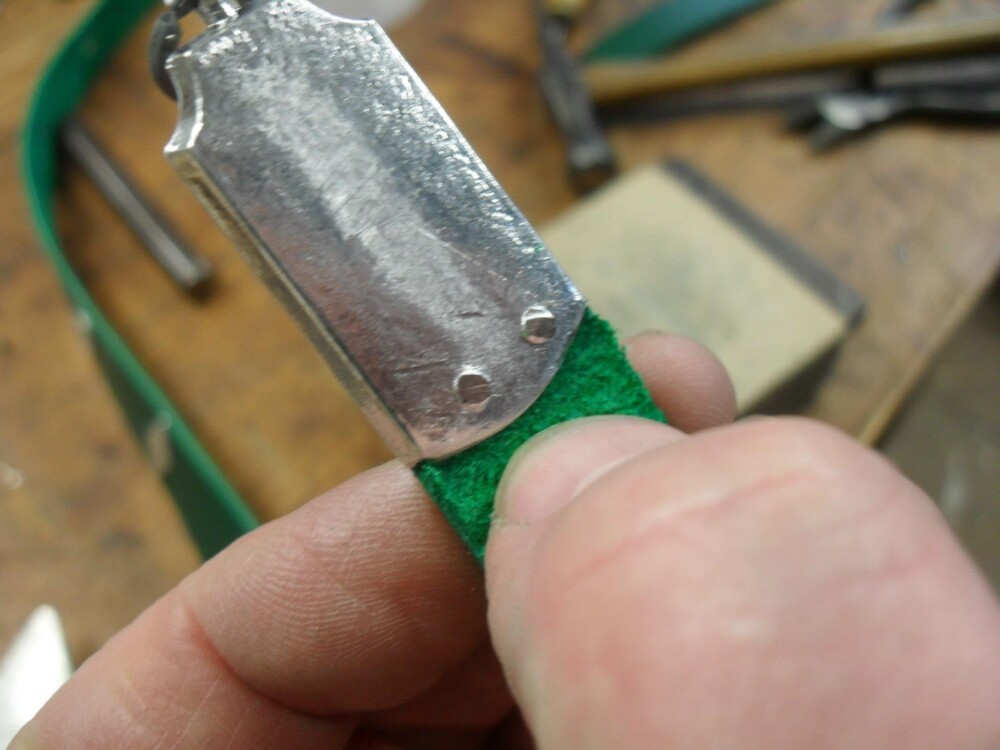
Figure out where the end of the chape will go; mark the leather, then cut off the excess. Thinning the end of the strap lets it fit snugly into the socket of the chape.
If you do not have a head knife, you can use other tools to skive down the thickness. We have used an X-acto knife, a Skife razor blade skiving tool, a leather splitter, and a grinder. Practice on a scrap piece first. Trim the edges to a slight taper… … that fits exactly into the chape.
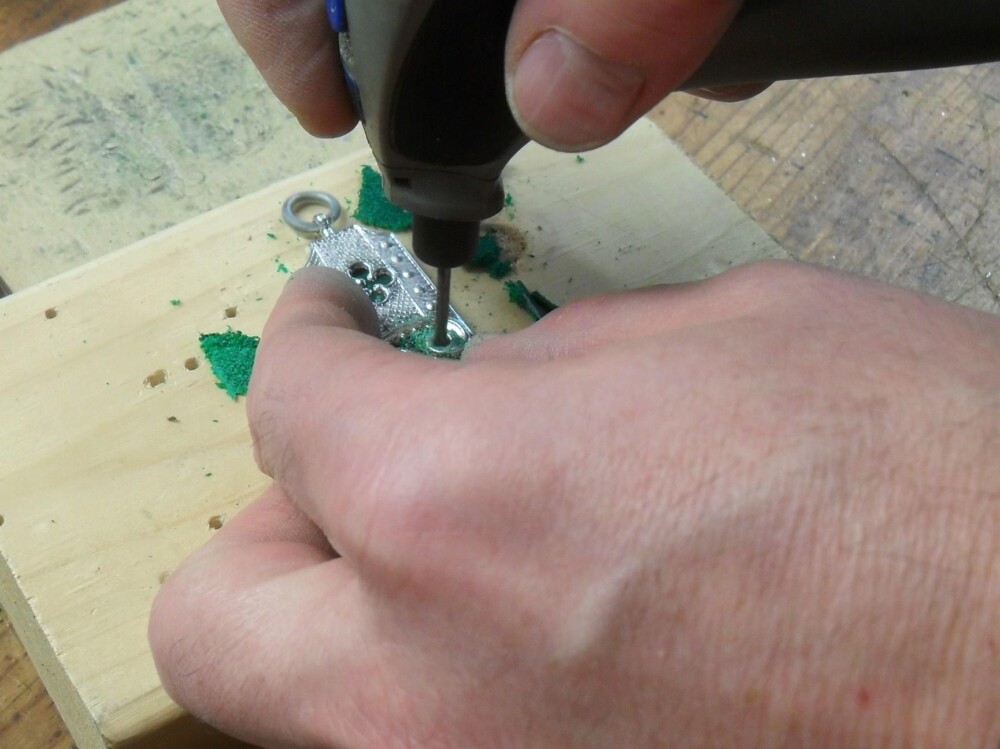
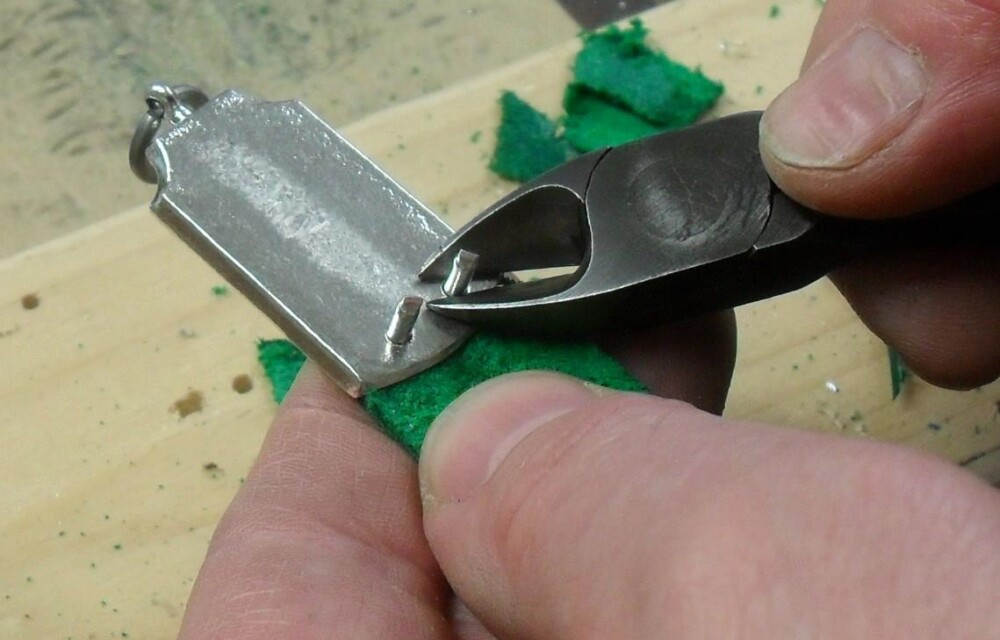
Drill straight through the leather and the chape together. Our rivets fit in holes drilled with a 3/32″ (2.4 mm) drill bit. We drill into a piece of scrap wood. If you drill though the “sandwich” of pewter and leather, your holes are certain to line up.
Press the rivets into the holes. As before, nip them off close.
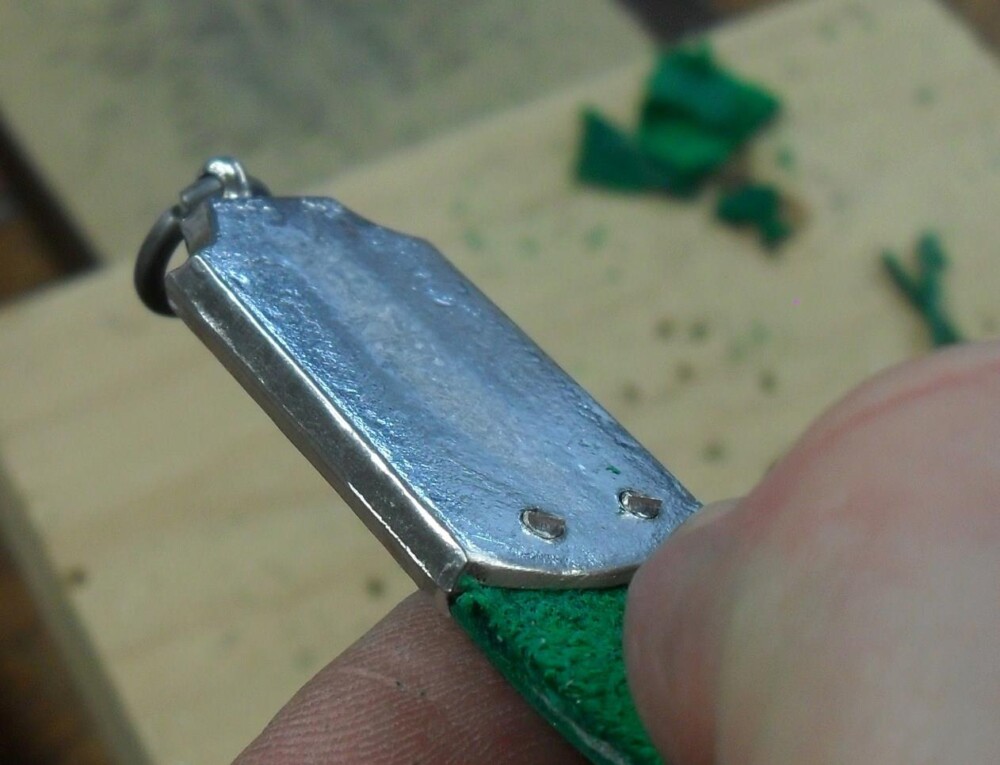
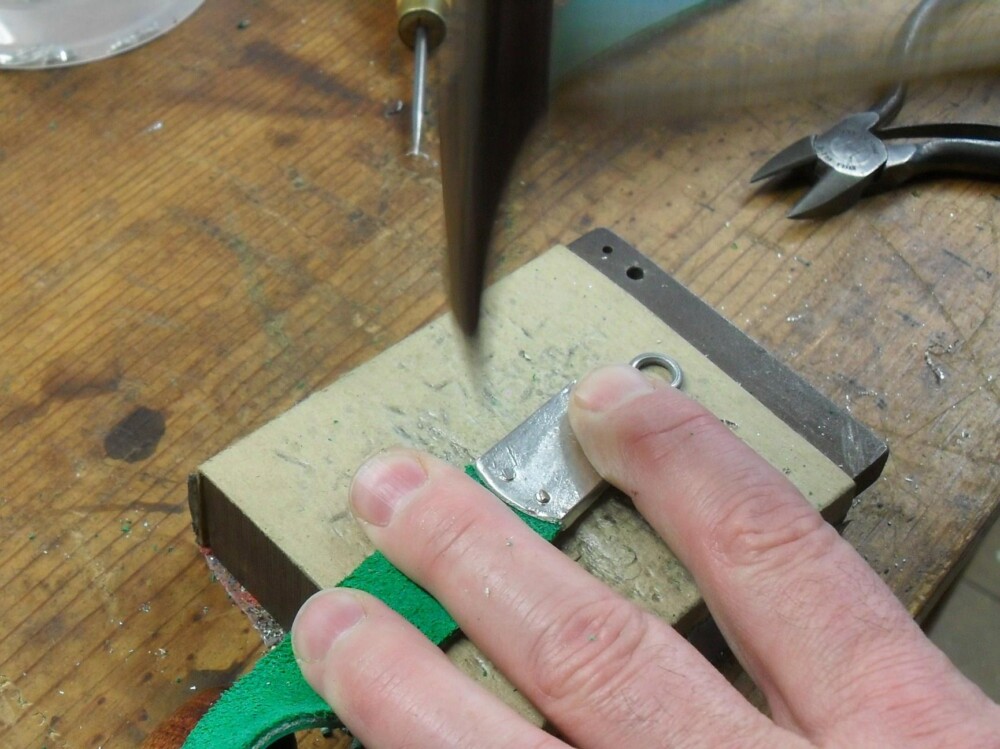
Really close. In this case the back of the chape serves the same function as the washers did when attaching the buckle – they give you something to peen the rivet up against and keep it in place. The rivets are secure. Give them a final tap with the larger face of the hammer to make the back of the chape nice and smooth.
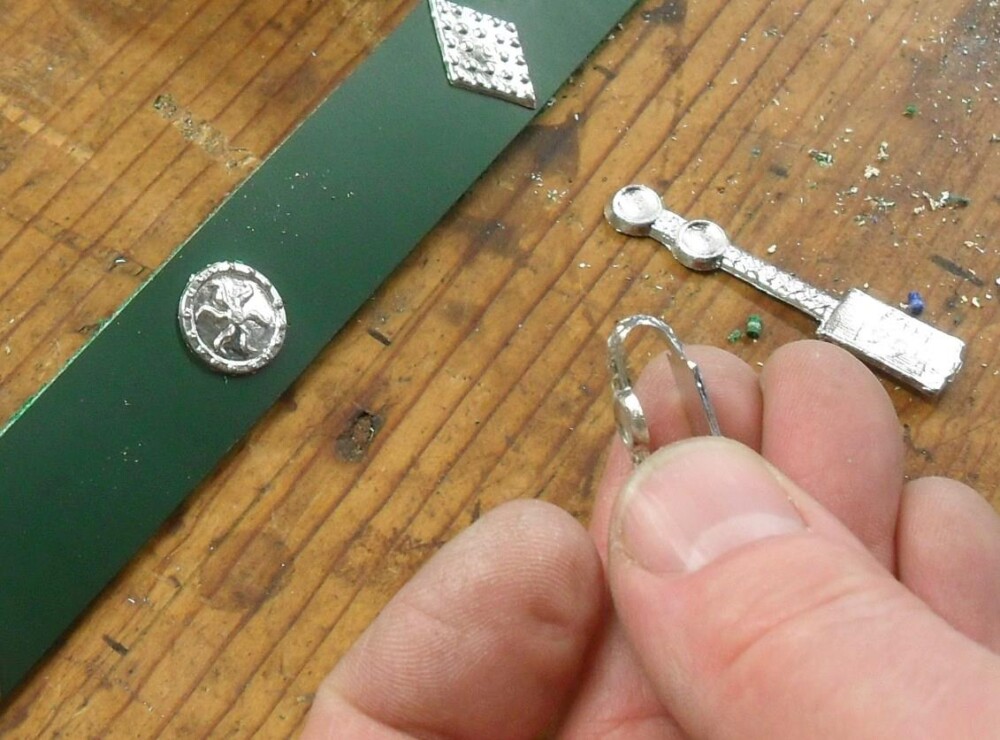
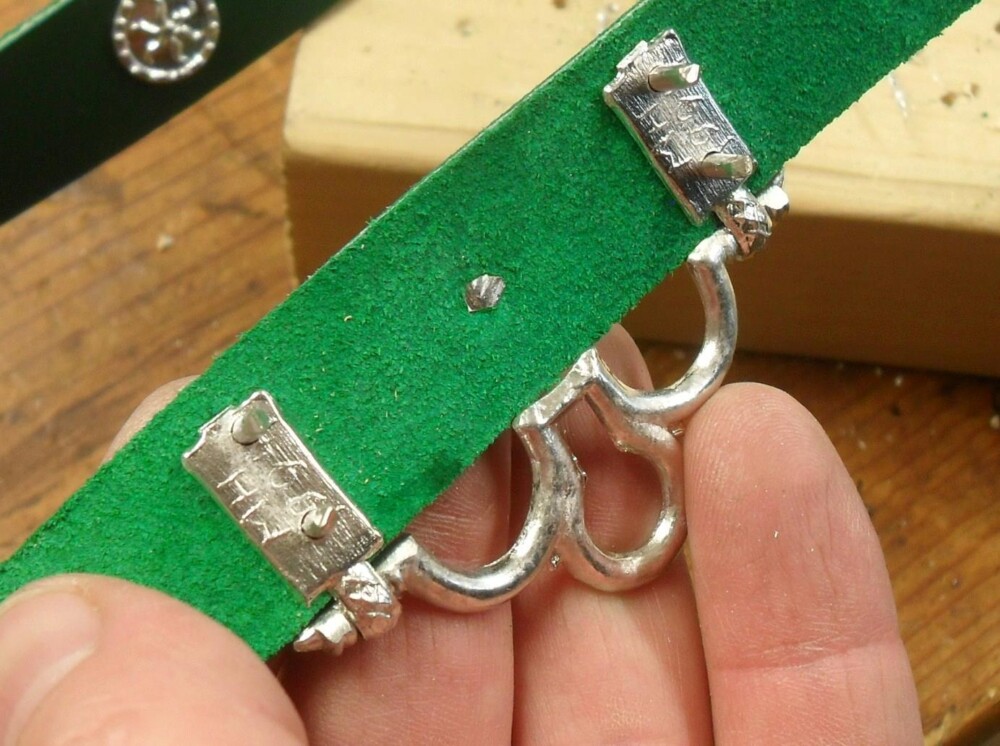
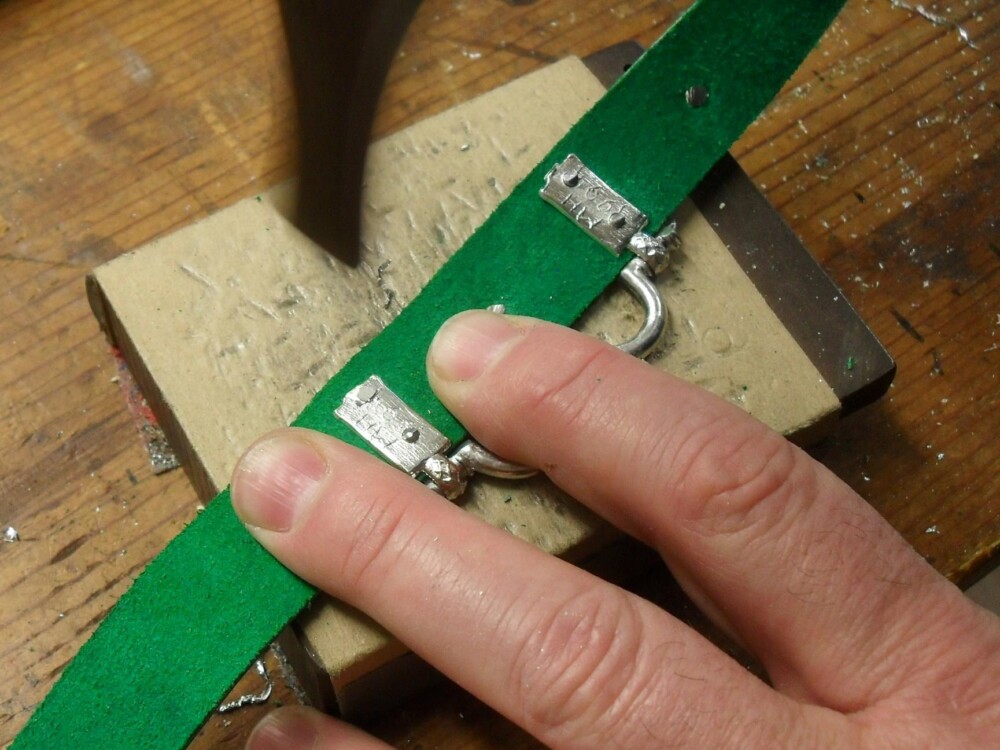
To attach a purse hanger, start by folding the hanger pieces. Slip one over each end of the hanger.
Depending on your stud spacing and your layout, the hanger may fit around one stud or replace two. We’ve said this before: drill straight through, leather, pewter, and all, to keep all the pieces aligned.
The rivets go through…. … are nipped close …. …. and peened up. To learn more about this process, see our blog post Attaching a Purse Hanger. It covers the same information, but with more words and more and different photos.
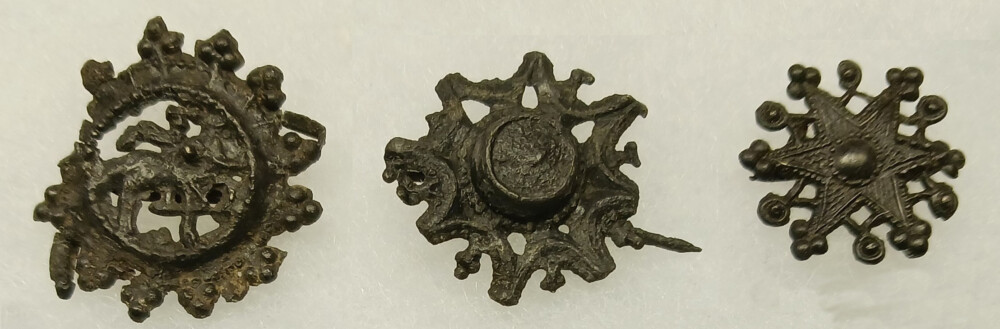
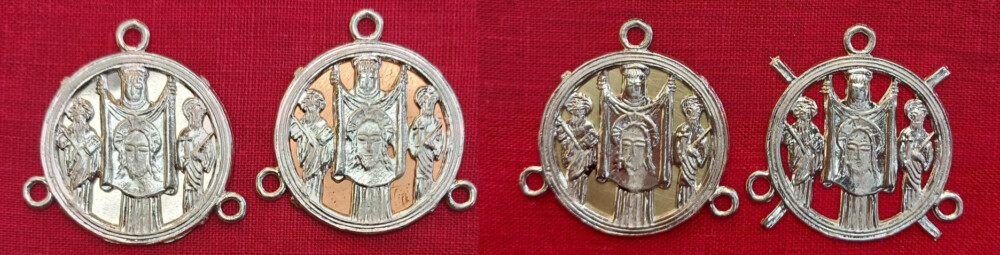
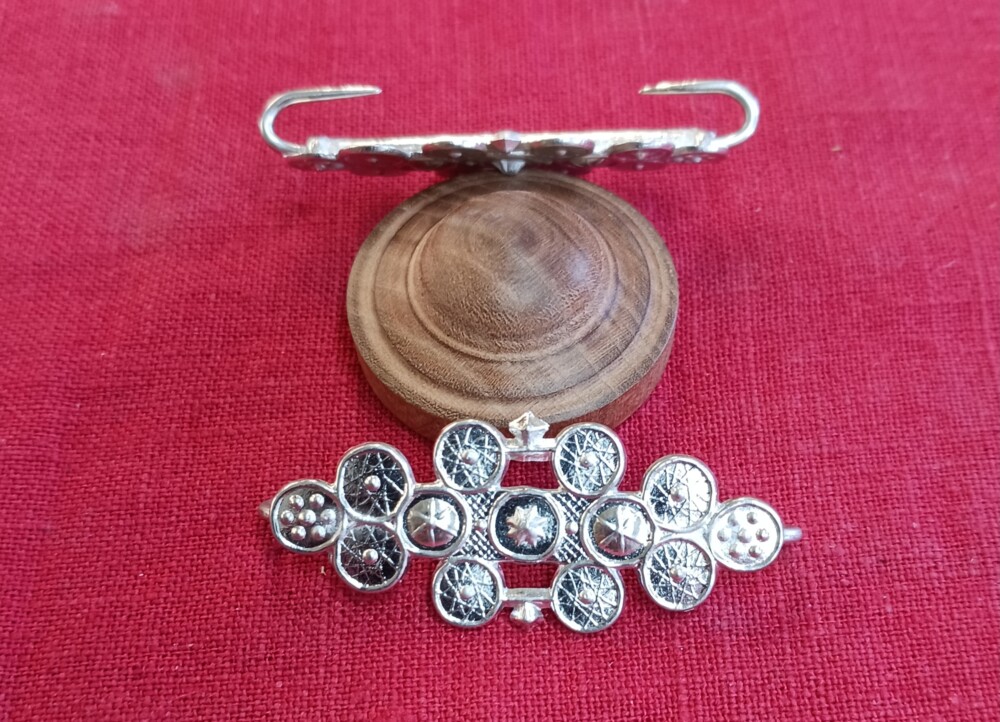
Many medieval pewter pieces had a central figure in a frame or some other openwork that let you see straight through the piece. Here is a small selection of real pieces from our collection.
And here are some shown in contemporary paintings: on the left. St. Roch, c. 1480. On the right, St. Josse, c. 1500.
In some openwork pieces you see the clothing of the wearer (or whatever else the item is attached to) through the openings, as with St. Roch’s middle sign. In others, there is a backing attached to the pewter, and you see the foreground figure against the backing instead – just as the backing of St. Josse’s larger pilgrim sign shows, rather than his hat.
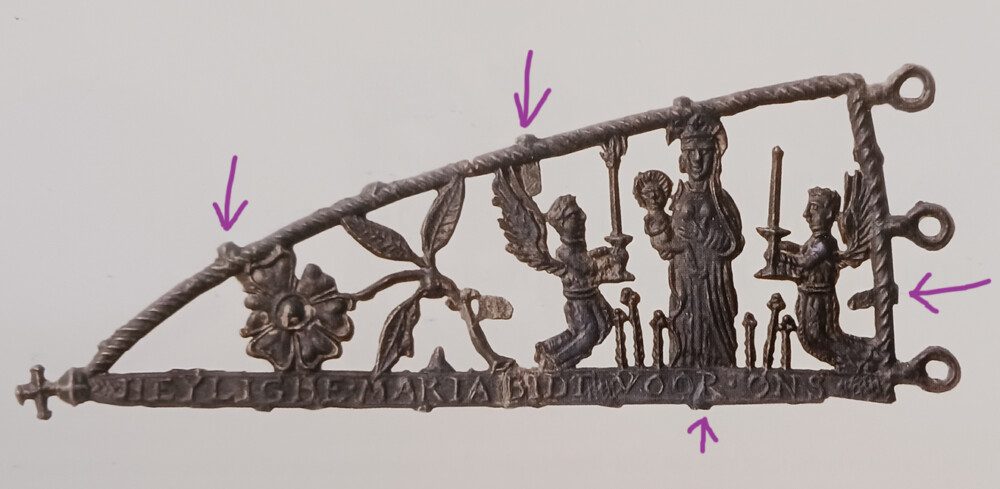
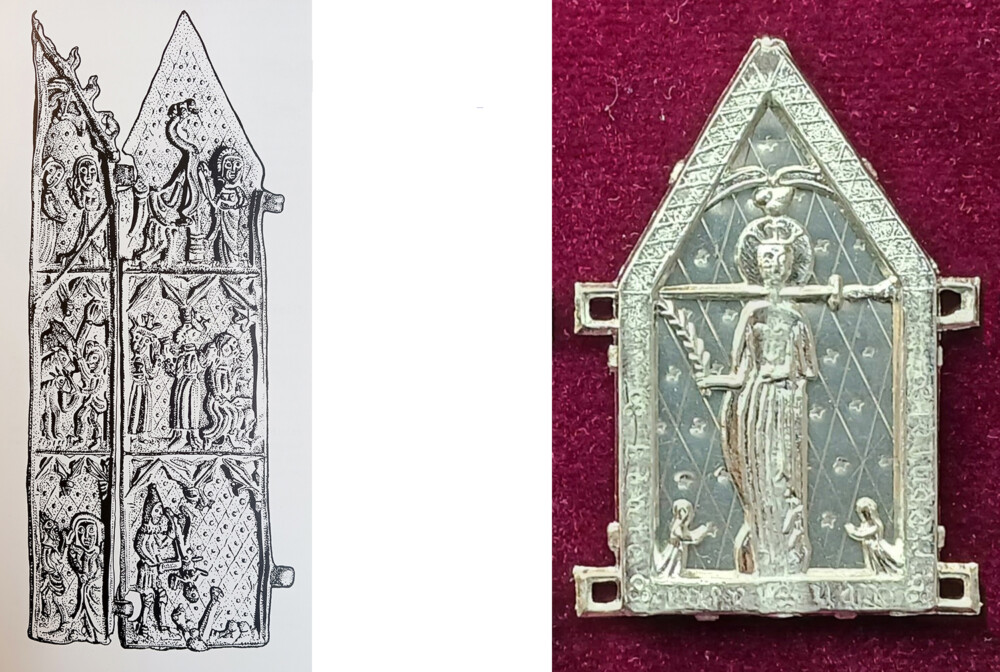
Pewter items that were designed to take a backing have little tongues or fingers sticking out from the edge. You fold these tongues over to hold the backing in. Medieval castings with tongues almost always have them bent in – whether the backing is still there or has been lost. Here’s a Flemish pilgrim sign with the Virgin inside a banner. The arrows point to four of the ten (maybe eleven) folded over tongues that once held in a backing.
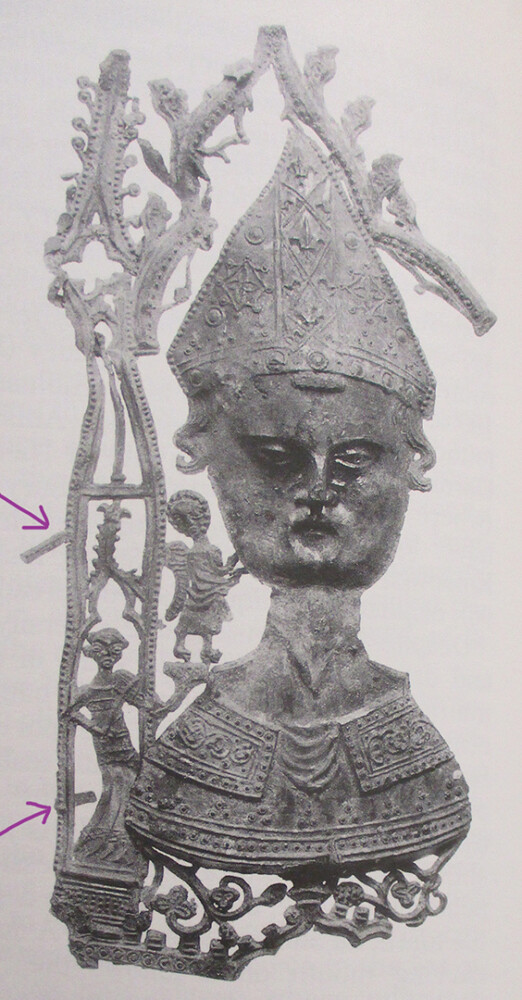
And here is a partial pilgrim sign from Canterbury (now in the Museum of London). The upper tongue on the left is sticking out, bent down a little, but in the same position it was cast in. The lower tongue is folded in.
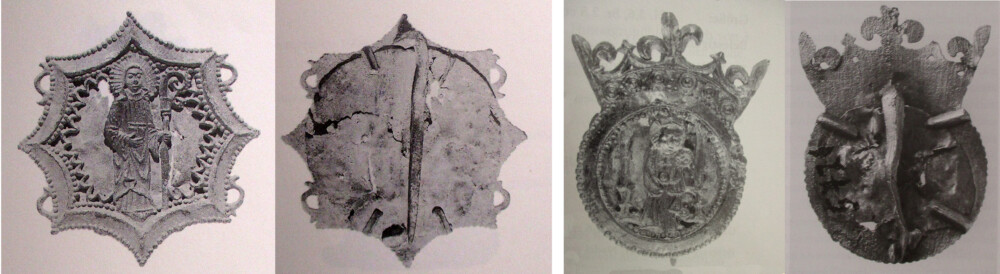
A small number of medieval pewter signs, brooches, and pendants still have their original metal backings. Here are examples, fronts and backs, from the Musee de Cluny (left) and from the Yper City Museum (right).
Museum and collection records seldom identify the metal backing materials fully or accurately . They are frequently described (I’m translating to English here) only as “metal” or sometimes, “a backing plate,” or “a sheet.” When the metal is identified, we still have to be cautious. A backing identified as “tin,” “lead,” or “pewter,” may actually be any of those metals or alloys, unless the piece has been subjected to analysis by radiography, X-ray fluorescence, optical emission spectroscopy, etc. Usually someone just guessed based on color, oxidation, corrosion, damage, or signs of fabrication.
Enough backings have been reliably identified that we can be sure – at a minimum – that copper and tin (or tin alloys) were used. This banner- shaped pilgrim sign for St. Job at Wezemaal (HP 3, no.2369; Kunera 16449) dated 1525-1575, has a backing identified as copper.
The backing of a round brooch showing a king and a bishop holding up a city gate or other structure between them (HP 2, no.1687; Kunera 06817), dated to 1383, in the Yper City Museum has been identified as tin.
Many extant pieces have folded over tongues, but no backings. This strongly suggests that their backings were materials that degraded over time. (A small number of other materials are sometimes held into pieces with pewter tongues, including mirrors and wood, but they are uncommon. We will discuss them in the future.) If you were re-creating one of these objects, it would be reasonable to make a backing of parchment, paper, or cloth (perhaps glued to parchment or card). Any of these might also have been painted – either as a solid color or embellished with a decorative pattern. As we will see in a moment, patterned metal backings were used, although infrequently. I do not know of any direct evidence for the materials of the absent backings, so this is speculation, but it seems reasonable. It also seems possible that some pieces were offered with a choice of metal or parchment/textile backings – presumably at different price points.
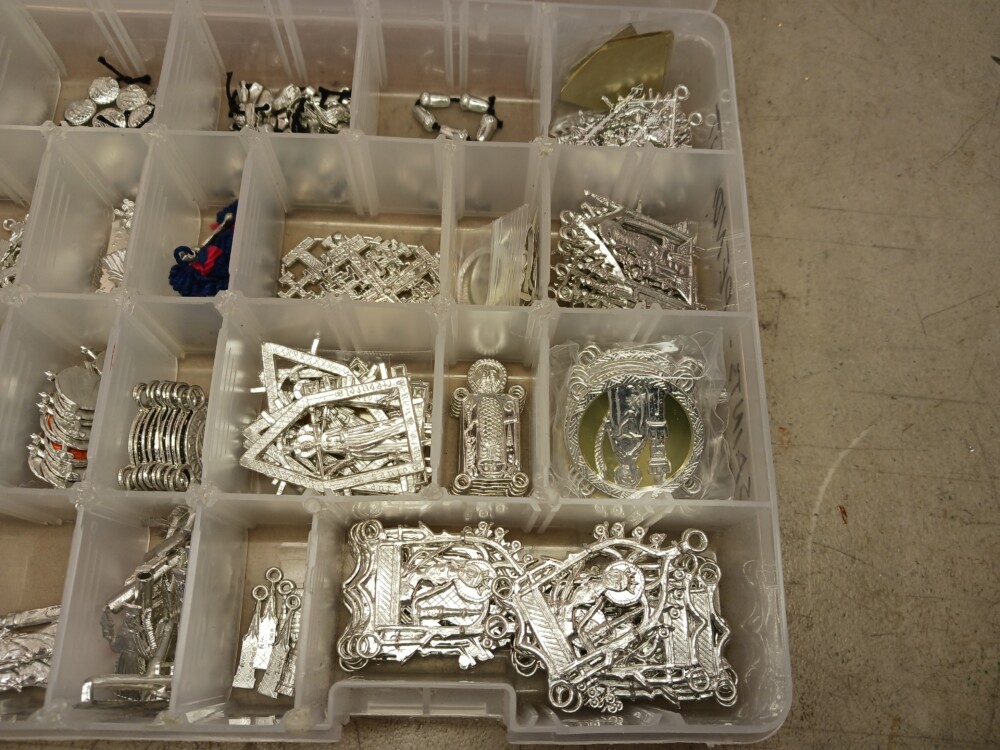
Our pieces with backings
Up to now we have offered metal backings for openwork pieces where the originals have the little tongues, including many pilgrim signs, two miniatures, and one naughty item. We’ve used both brass and copper, which are easy to buy in thin sheets six inches (~15 cm) wide and several feet long. We’ve supplied the checkers (draughts) board with either red or black paper backings. We recently became interested in offering pewter backings, so we bought a rolling mill which lets us make our own thin sheet. We have experimented and decided on pewter sheet approximately 10 mils thick (10/1000 of an inch or .254 mm) for our backings. We are using copper sheet of the same thickness and brass sheet, which is stiffer, 8 mils (8/1000″ or .203 mm) thick.
I was concerned that the pewter backings might not show off the pewter openwork well. In fact, in some lighting the design is not immediately visible, but as soon you move the piece, the reflections off the various parts make the image clearly visible – and extremely striking. There is a very brief video of a sign of St. Barbara at https://www.youtube.com/shorts/eRYl24tQdIo.
Even fancier backings
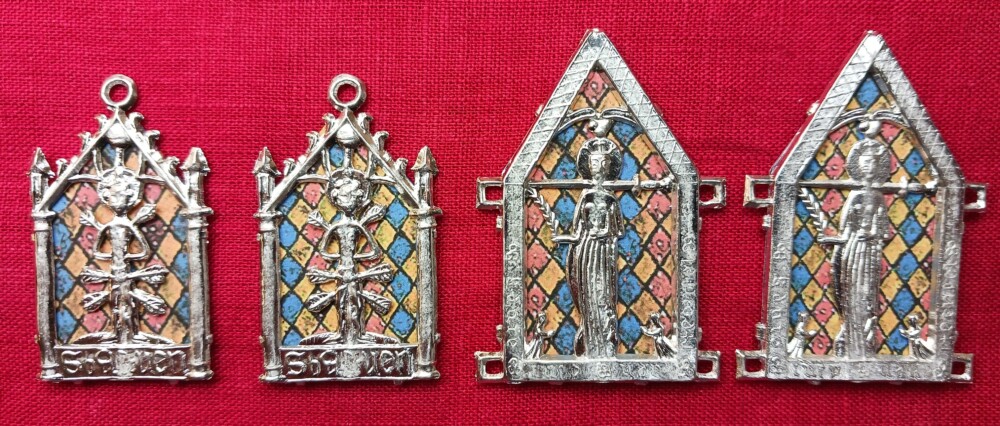
Although we are not offering these options for sale, you may be interested in two of our further experiments. The first uses decorated pewter sheet. The two leaves of a small three-dimensional shrine in Salisbury (left, below) have a wrought metal sheet background with a simple pattern. We have made some exploratory pewter backings worked with a diamond pattern, like the backing for the St. Lucy sign, below right. See a video of this sign with the patterned pewter background in motion at https://www.youtube.com/shorts/KwbRvrHnPqY.
We have also faked up a colored background based on one of the diaper patterns in the Göttingen Modelbuch. These are satisfyingly gaudy and, like the pewter sheet, show best when the piece is in motion. We are still experimenting with the scale of the pattern and the colors which offer the best contrast. These offer more insights into the possible range of decorative backings for castings in the Middle Ages.
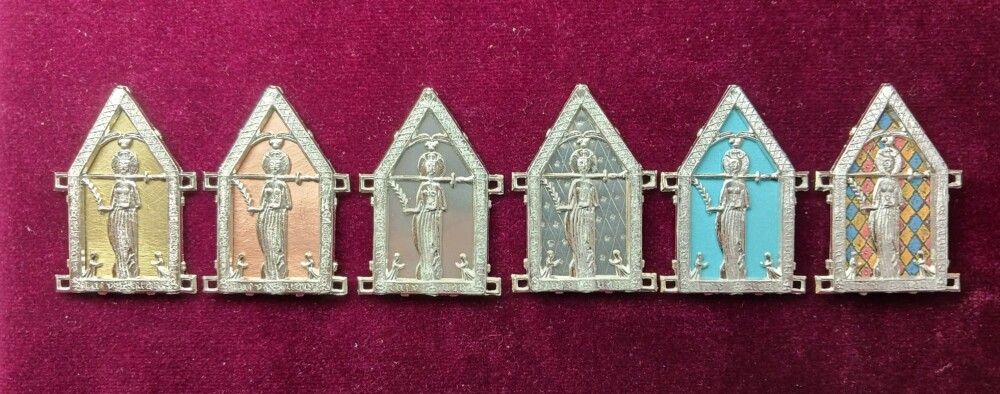
While we continue to learn more about the backings, we have started offering a range of options for our openwork pieces. Each item on our site with a backing is now photographed with backings of pewter, copper, brass, and colored paper – and with no backing at all. Check them out! You can order them with any of the metal backings – or “empty,” with a pattern so you can fit them up to suit yourself.
Be sure to share your creations to our Facebook page, or on Instagram (tag #billyandcharliepewter and #billyandcharlieDIY). We can’t wait to see what you come up with!
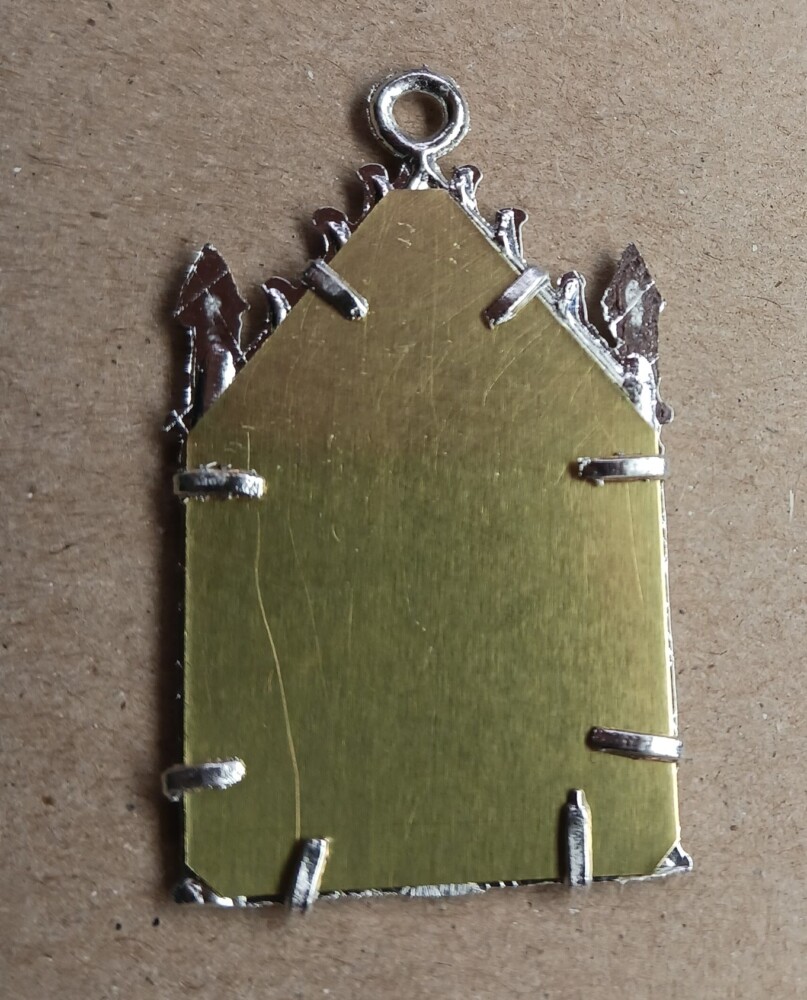
Some medieval openwork objects had backings against which the cast pewter stood out. These pieces can be identified by the little tabs that stick out from the edges, which were bent in to keep the backing in place. In many cases the backing has disappeared; these may have had backings made of parchment or paper – or cloth backed with parchment or paper. Some extant pieces have metal backings. Many of those are probably pewter sheet, but there are a handful of later examples with copper alloy sheet. We use paper and brass (or occasionally copper) sheet for some of our excellent items. The process is simple and creates really beautiful results.
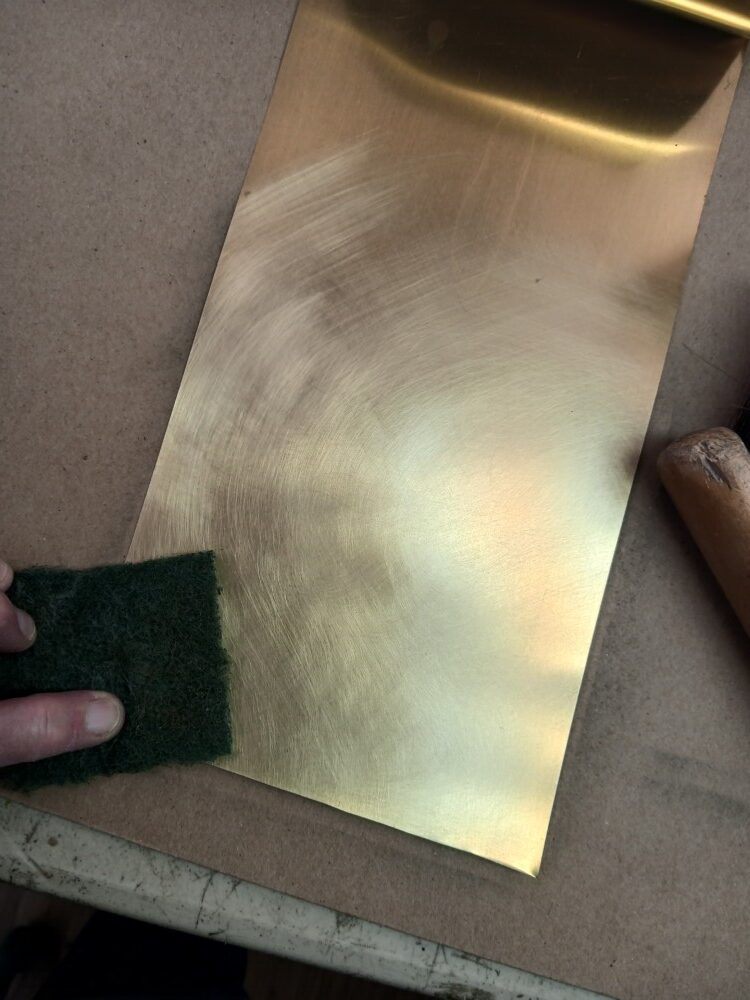
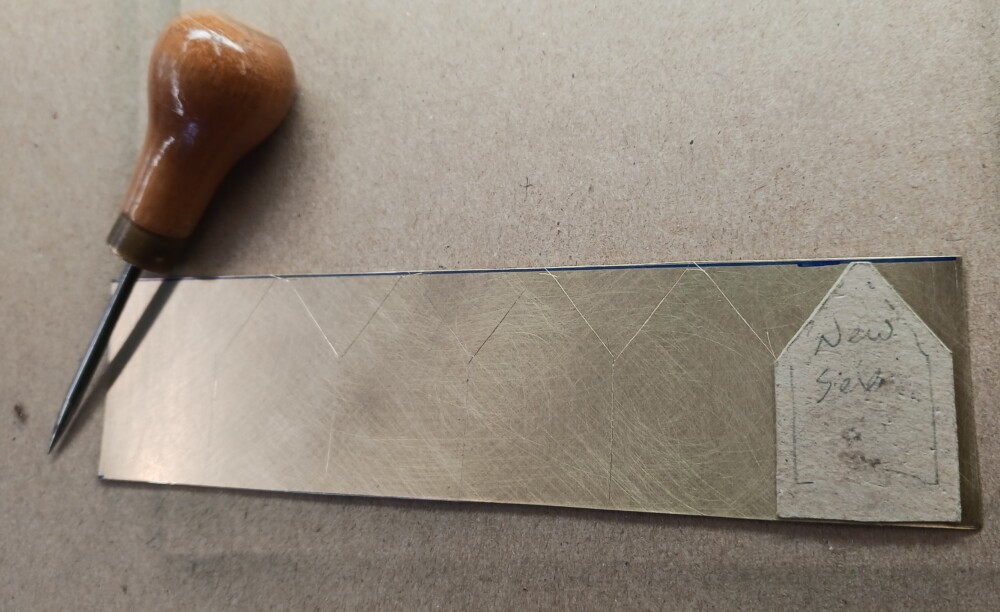
We buy our metal sheet in rolls as half-hard brass shim stock. Of course, we do not need the accuracy of shim stock, but it is a convenient way to purchase and store what we need. Most of our backings are .008 inch (.2mm) thick. As the roll of metal sits in our shop it gradually gets dull. We clean the oxide off and brighten up the sheet before we make the backings. Because the areas that are exposed are small – and surrounded by bright pewter – we finish with an unobtrusive circular pattern of fine scratches from the abrasive pad, rather than trying for a polish.
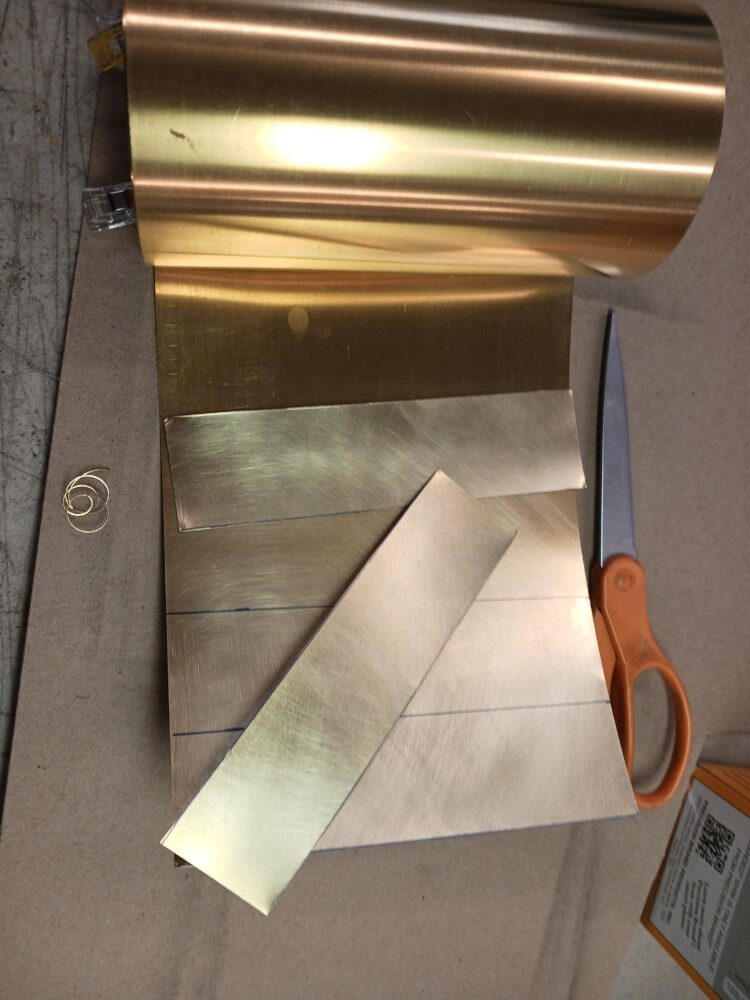
We cut the sheet off in strips wide enough to cut the backings from. At this thickness, we can use ordinary scissors to cut the sheet.
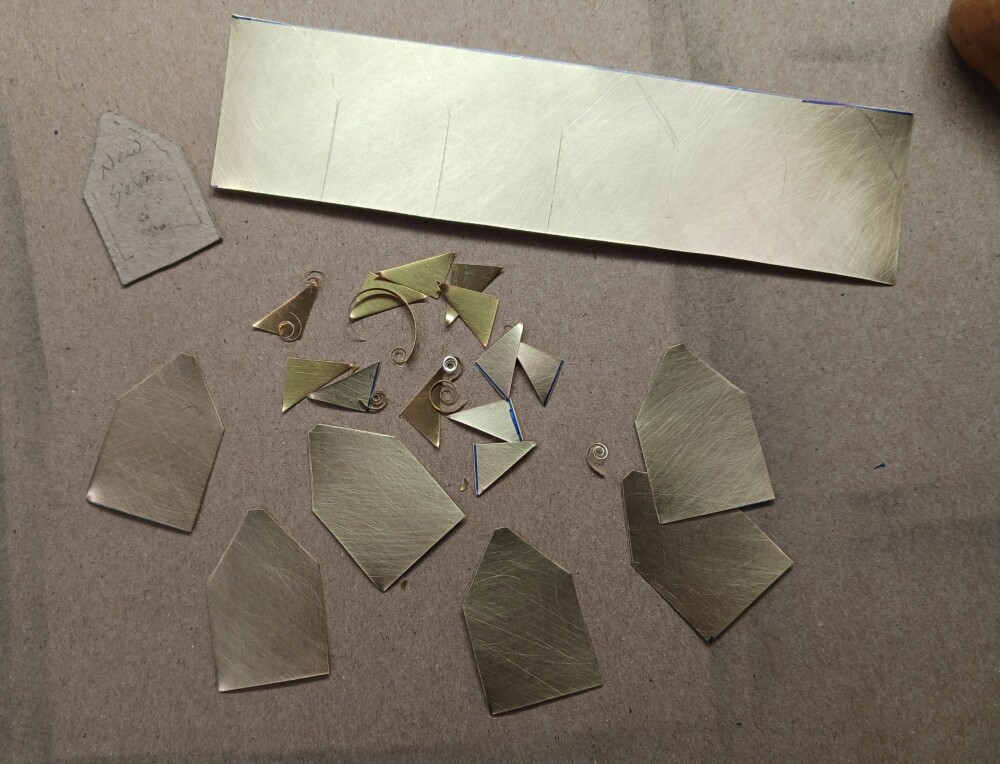
We use a cardboard template to trace the shape needed for each backing. The strip is just a little taller than the final piece, so each backing is trimmed on all sides.
This is just as well, as the cast pendant – and therefore the backing – is not symmetrical. The edges of the backings do not line up perfectly with each other, and trimming them creates many tiny, spiky curls of metal that shoot across the table as they are freed from the sheet. We usually find the last ones a couple of days later, by setting an arm or a hand down on them. Ouch!
The other result of cutting with the scissors is that the corners of the backings get turned up. We take a minute to flatten them (with the handle of the awl) and then nip them off with the scissors to keep them from catching on clothing when they are worn.
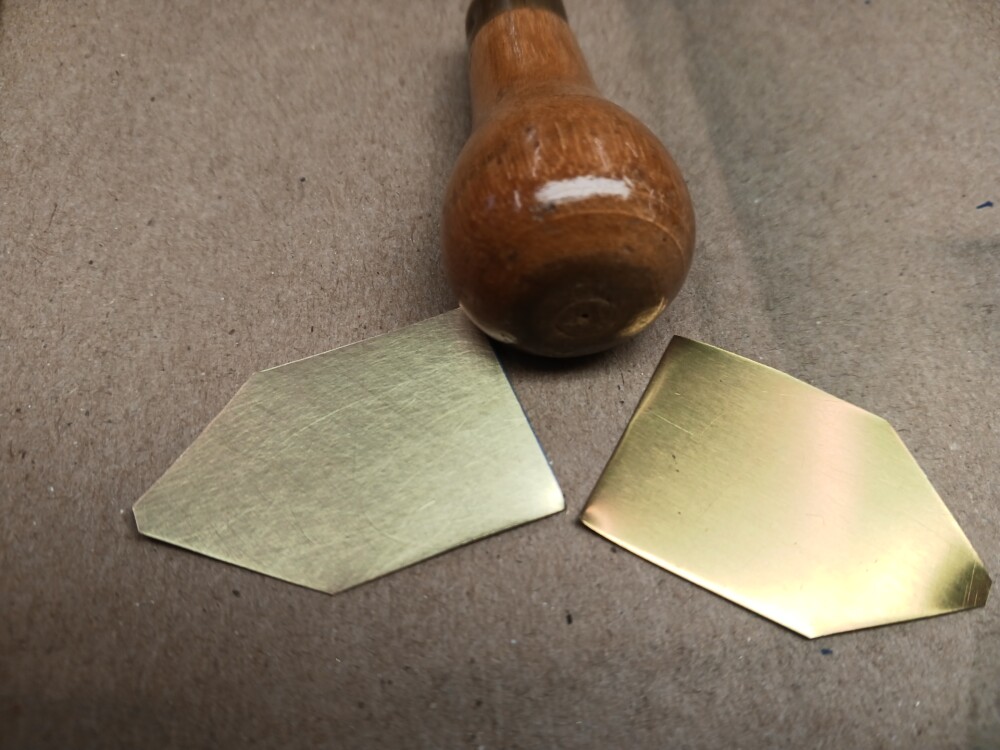
We set the pendants face down and add a backing. Remember that part about how neither the castings nor the backings are symmetrical? Because we only brightened one side of the sheet, and then traced the template on that side, if we put the backings on with the bright side toward the castings, they will always fit.
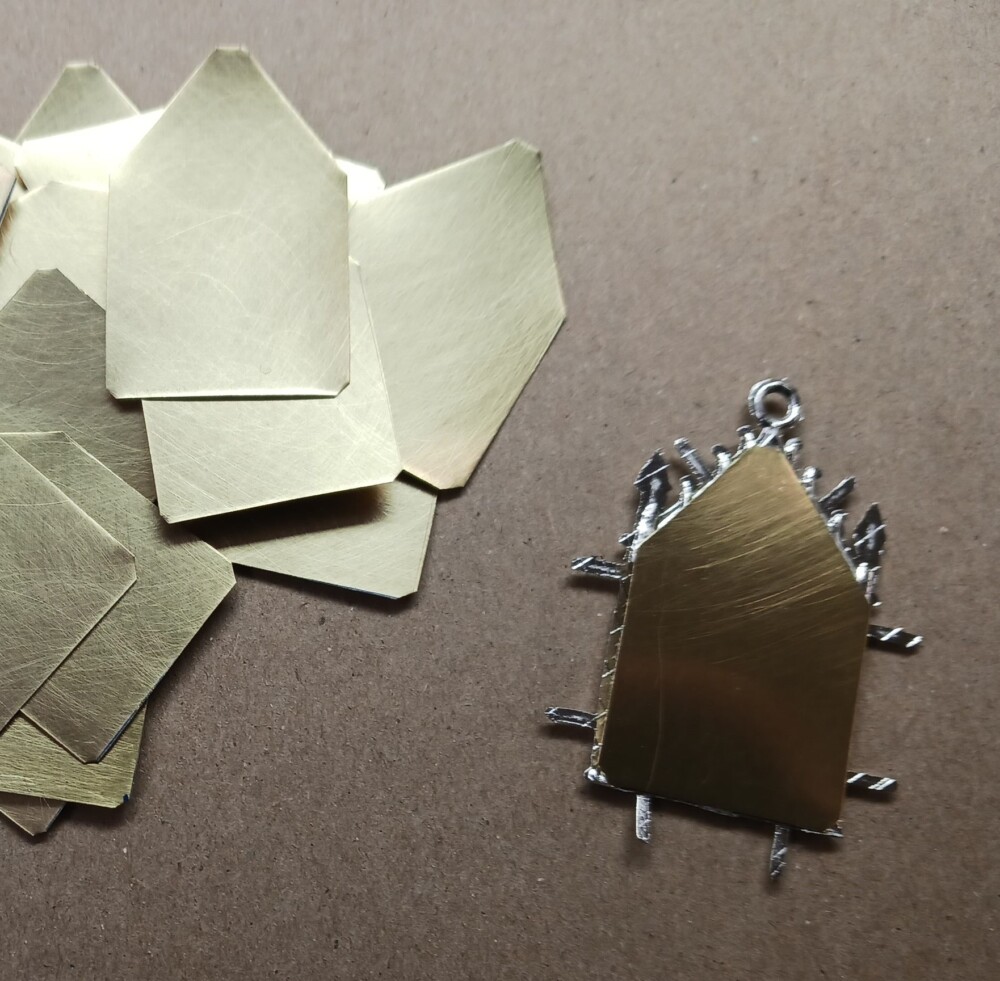
The clips fold over easily and hold the backing in place.
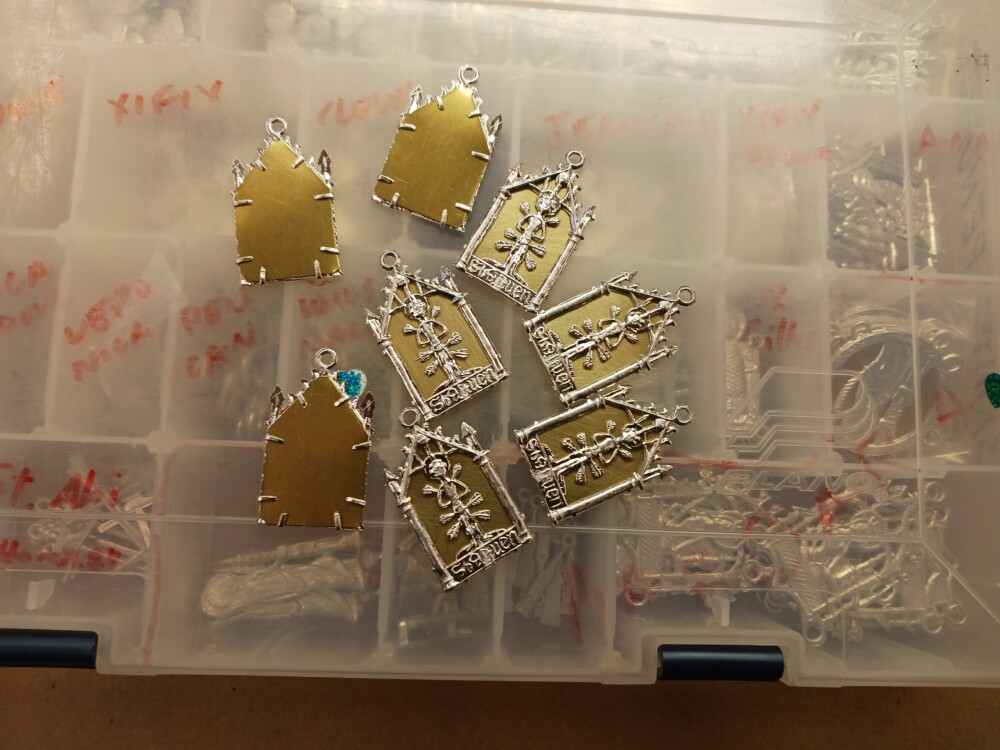
To keep the backings bright while the pendants await their new owners, we keep them them in small plastic bags inside our storage bins. The St. Barbara rondel badges near the front have the backings installed already, so the entire piece must be enclosed. The St. Sebastians at the back are still separate, so only the backings need to be put in a bag.
We have cast a hook into our new pewter cloak clasp. Several of our goods have copper alloy or ferrous wire/rod cast into the pewter pieces.
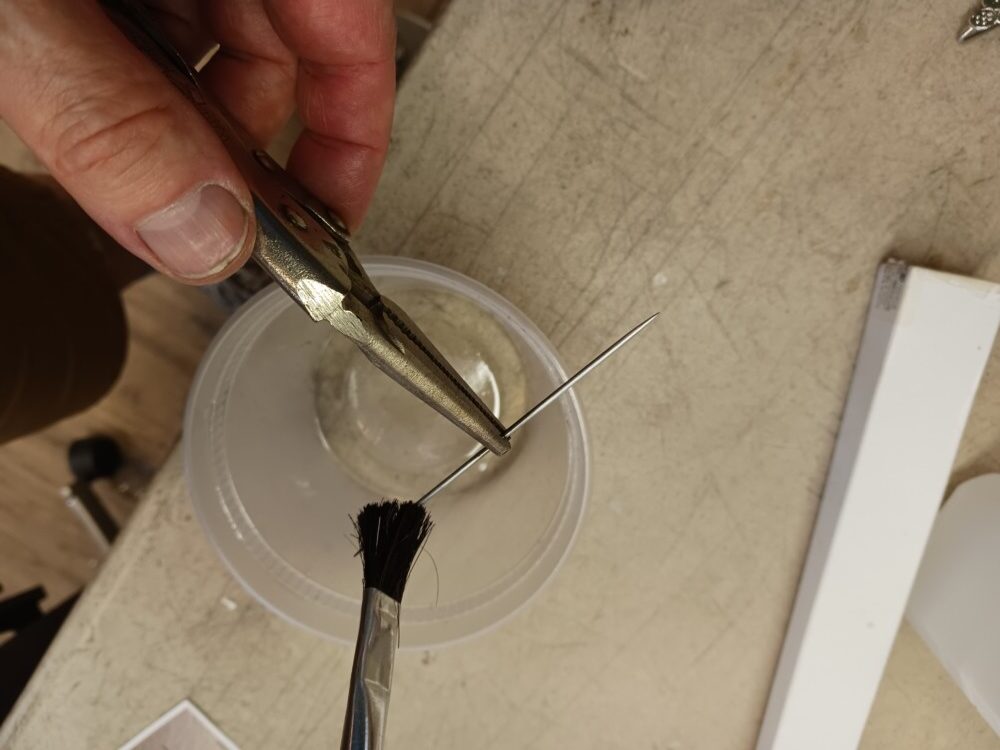
The new cloak clasp is copied after an original clasp from Rotterdam, the iron hook of which has partially rusted away. To replicate this object, we cut 16 ga. mild steel rod to length.
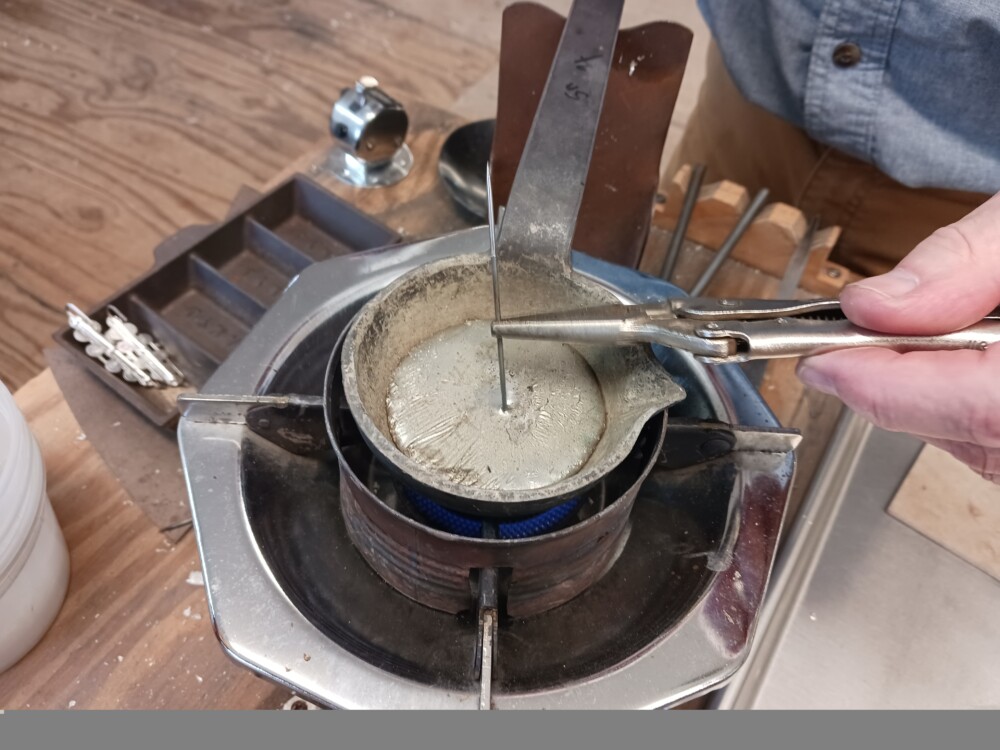
We sharpen both ends of the pins. To tin them, we brush an acidic commercial liquid soldering flux over the parts of the rods that will be exposed, then dip each end in a pot of molten tin.
We wipe the excess tin off. When all the pins are prepared, we put each one into the mold for the cloak hook. Closing the mold keeps the pin the the correct place and we fill the mold with molten pewter.
The pewter encloses the pin and holds it firmly. We cut off the sprues.
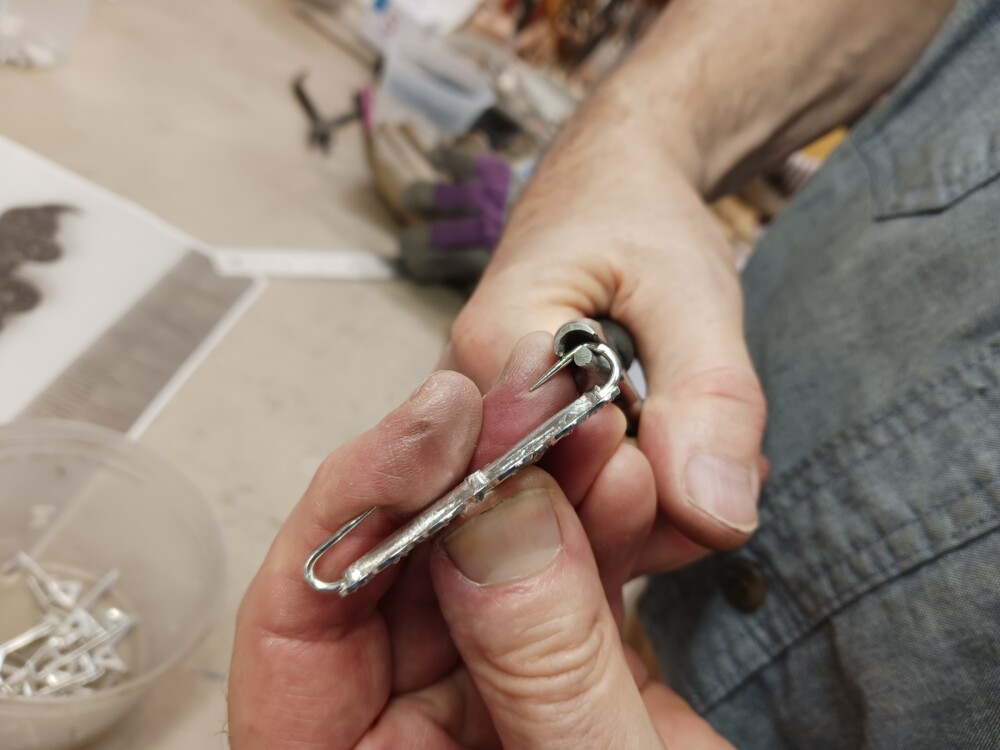
We use a wire looping (concave and round nose) pliers to bend the hooks into place.
Read more about this strong, decorative cloak hook. on the product page.
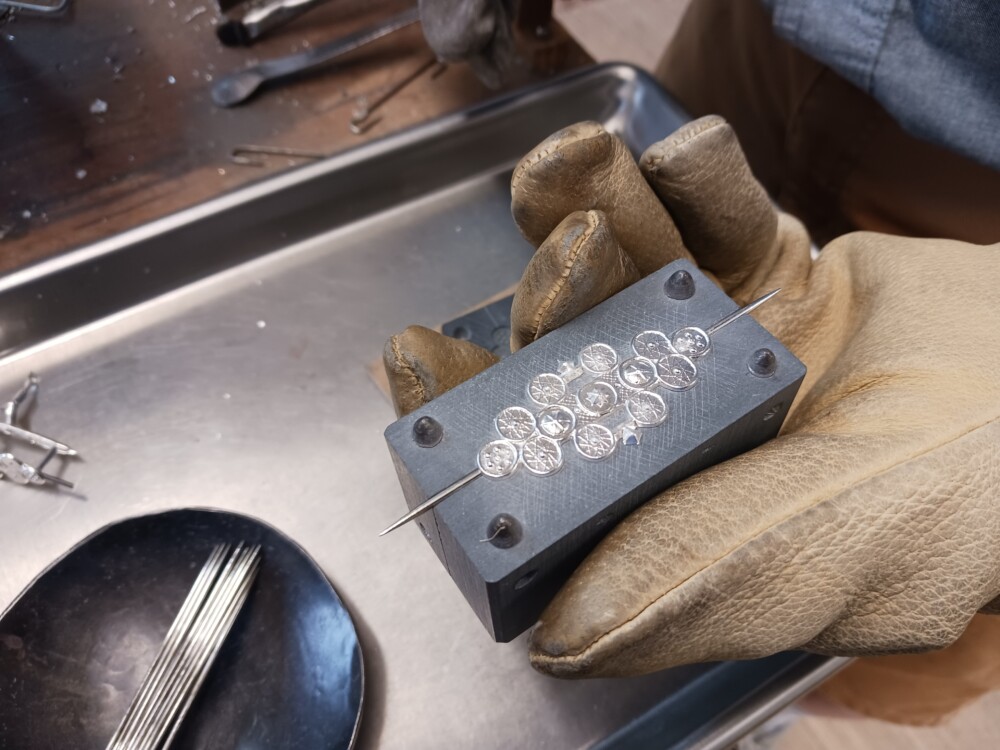
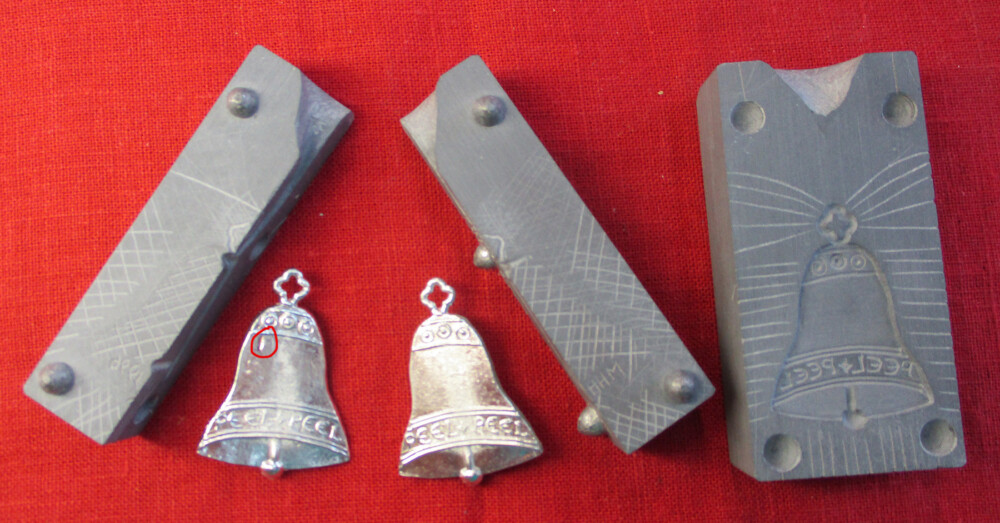
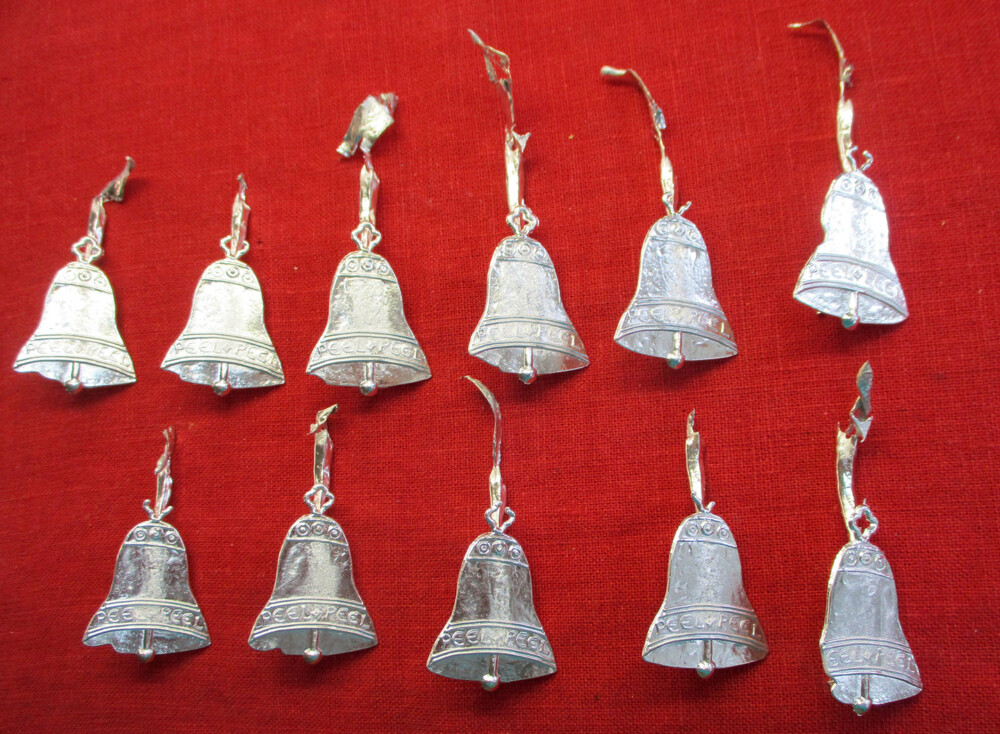
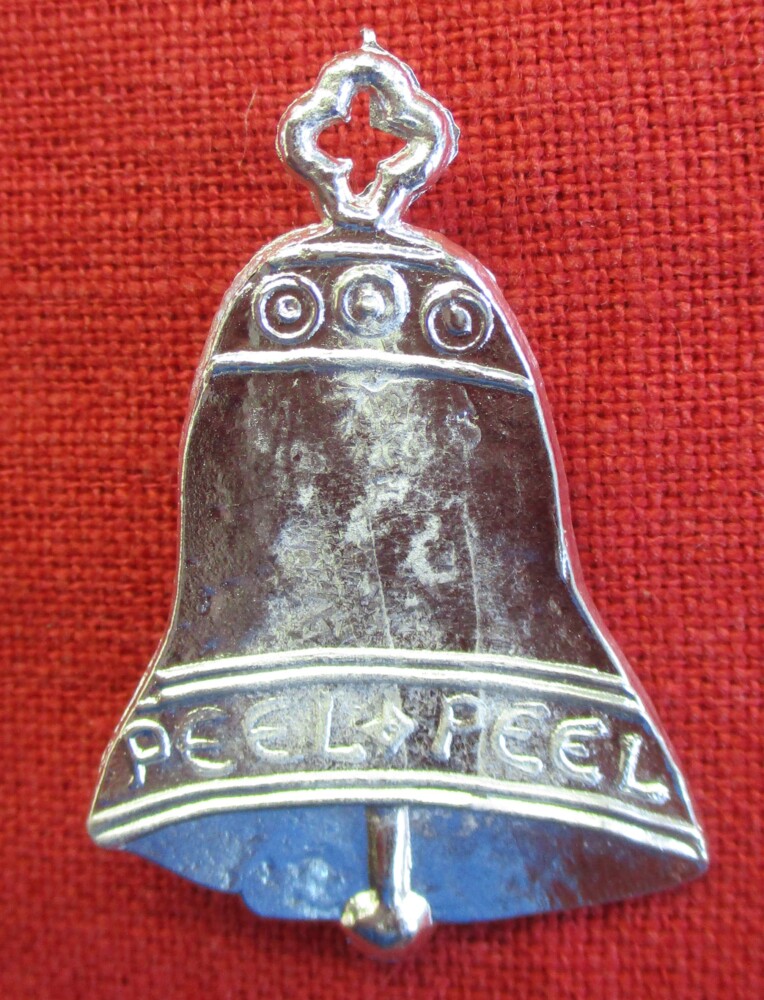
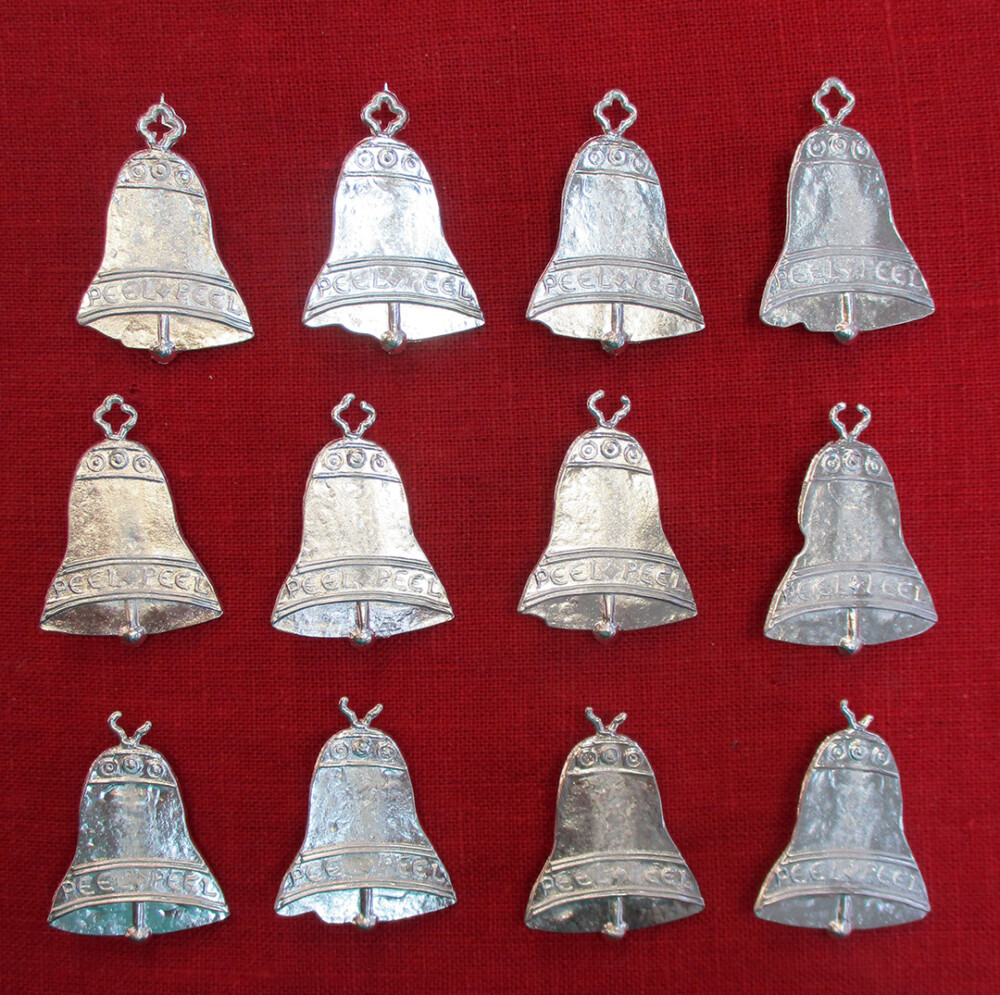
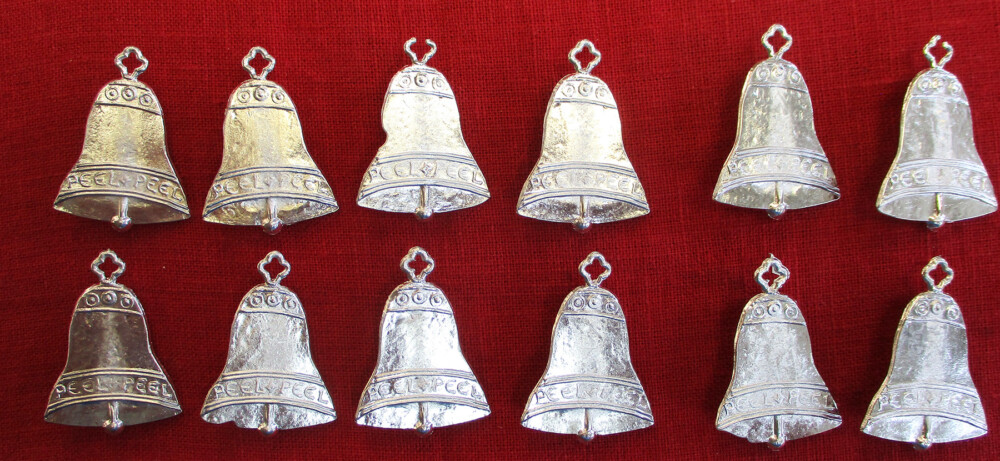
We were pouring some livery badges for the Belle Compagnie the other day and we ran into difficulties. Marianne made the mold in 1996 and, although it is a remarkably flat badge, which usually leads to holes and very uneven surfaces, these do not appear. This mold casts reliably, filling fully, as soon as it is warm enough.
Why is this a problem? Well, many medieval brooches, signs, and badges are cast incompletely. We do not offer products unless they are perfect (or near perfect) castings, because our modern customers have modern tastes – they are used to the uniformity of objects produced by industrial injection molding, spin casting, and pressure die casting. If we had a bin of pilgrim signs for St Adrian and in one of them the halo had not cast fully, most of our customers would keep shuffling through the stack to get a “good” one.
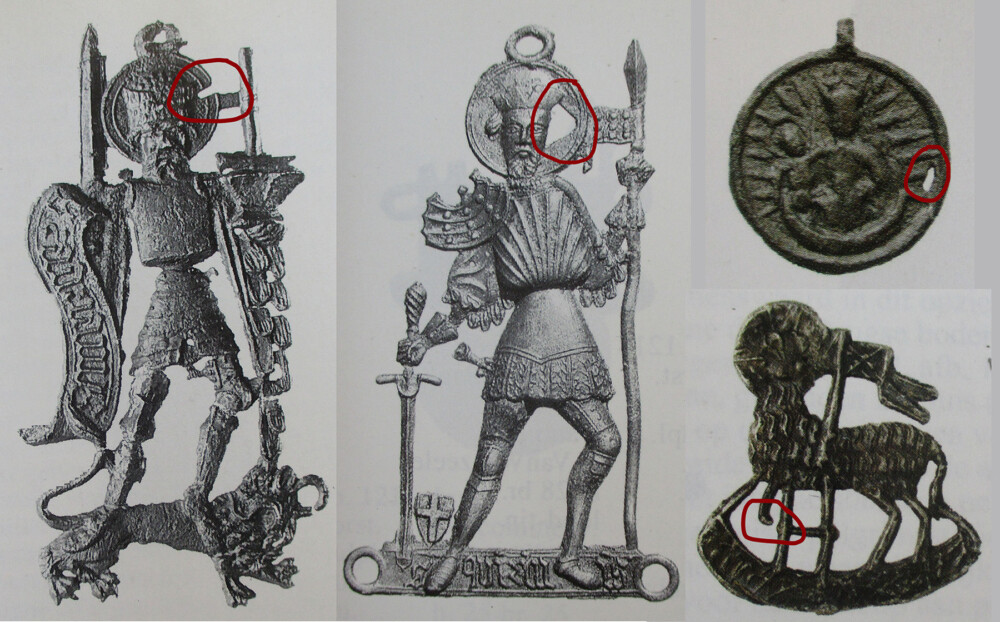
We can see from the extant historical pewter goods that the medieval customer either did not care as much or, in some cases, probably had no choice. Especially with saints’ signs acquired at holidays or festivals, it seems likely you took what you got and didn’t argue. The sign had been blessed and its spiritual value was identical regardless of the state of the casting. It didn’t matter if your saint’s halo didn’t cast or if the Virgin Mary’s medallion had a void, or if the Lamb of God was missing his knee.
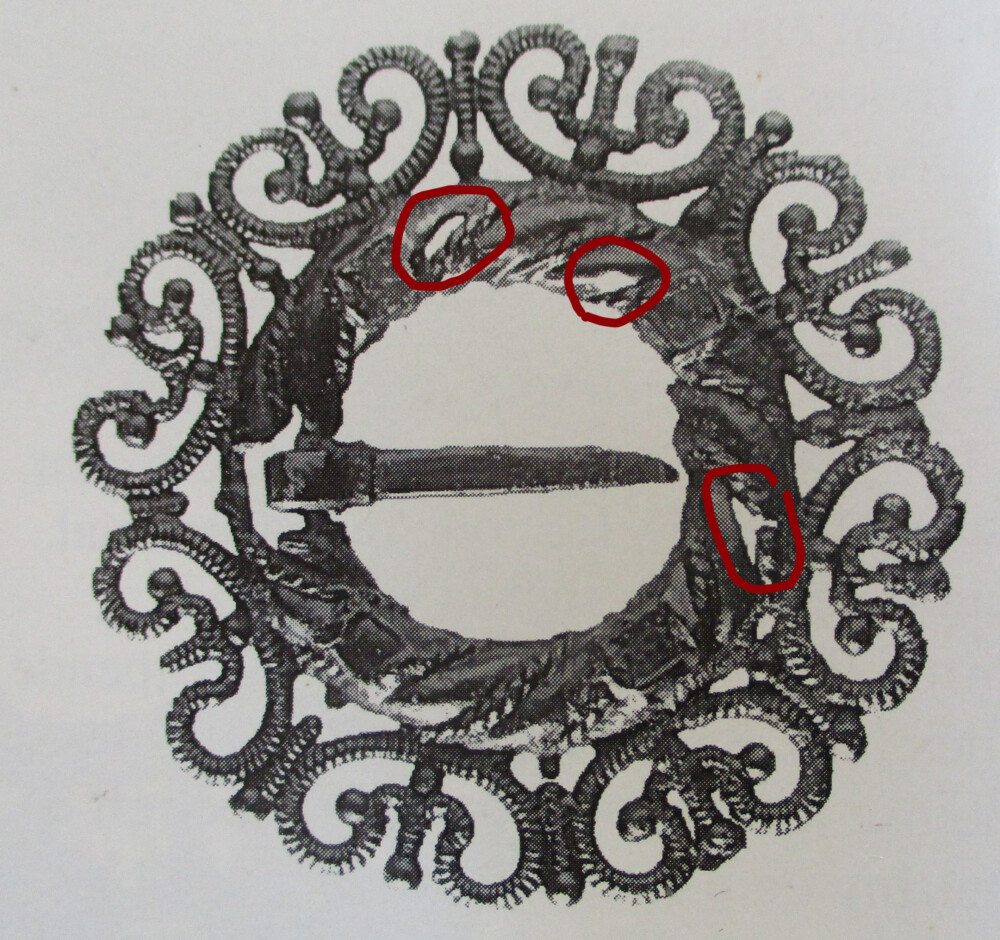
There was probably more pressure to have complete castings for decorative items, but even there we see examples that failed to fill fully, but which were pressed into use. This ring brooch has several casting voids – bubbles where the mold did not fill. Instead of being rejected, it was provided with a tongue so the brooch could be worn.
We tweak our molds for hours, sometimes working on them every time we cast them for years, so we get a lot of perfect castings. And we almost always toss incomplete castings back in the pot, rather than selling them. We do have customers who value a level of authenticity which includes incomplete castings – because they are sticklers, because it gives them a chance to talk at demos about religious practice or pre-industrial technology, because they find it amusing. In this case La Belle asked for a small number of imperfect castings of their custom mold among the complete ones, and we agreed cheerfully. That’s where the trouble began.
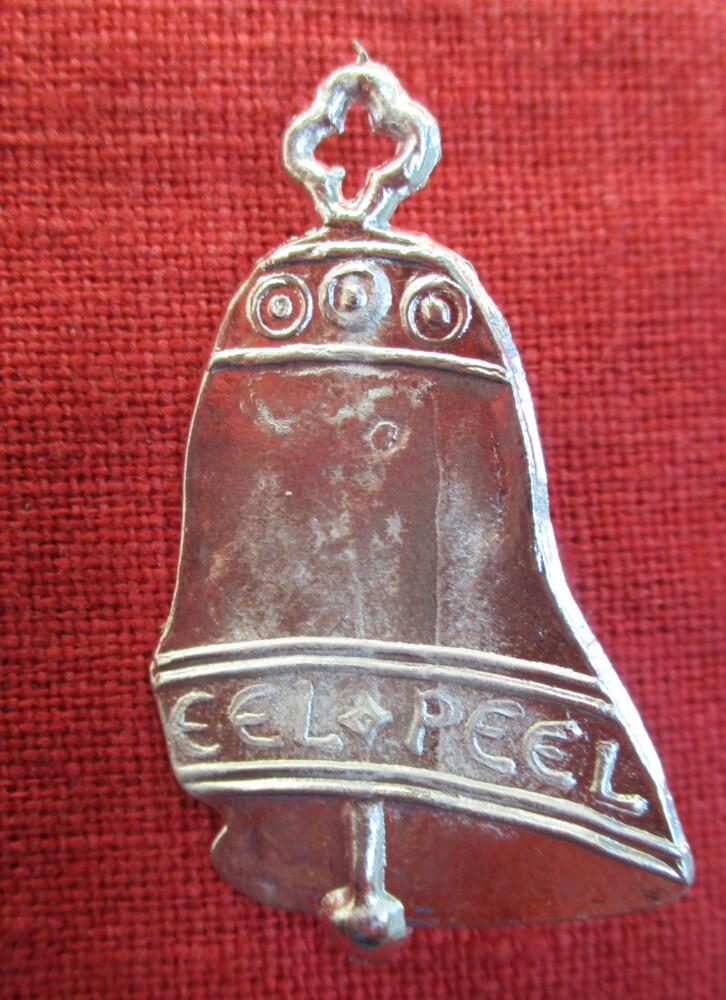
Mac poured the ordered badges and only managed a couple of castings where the loop at the top of the bell cast shy. He also got a few where the surface of the casting shows that the metal flow was not perfect – a place where a hole might have developed, if things were a little worse.
Marianne’s mold was too reliable; who remembers after 27 years, but she must have spent time on careful iterations to make the metal flow in as a sheet that filled the cavity evenly without trapping any air. In any case, Mac is in the habit of fidgeting as he casts to get the perfect angle, the perfect temperature, the perfect rate for the metal to enter the mold. He is really bad at doing it wrong.
So Marianne took on the task of producing “junk” castings. The most obvious way to do this is to have metal and/or mold too cold. Starting with both mold and pewter warm, but not warm enough, she began pouring. Once the mold and metal were at operating temperatures, she went back the other way – turned off the heat under the pot so the metal became progressively cooler with each pour. She did finally manage a series of castings where the bell or its loop did not fill completely.
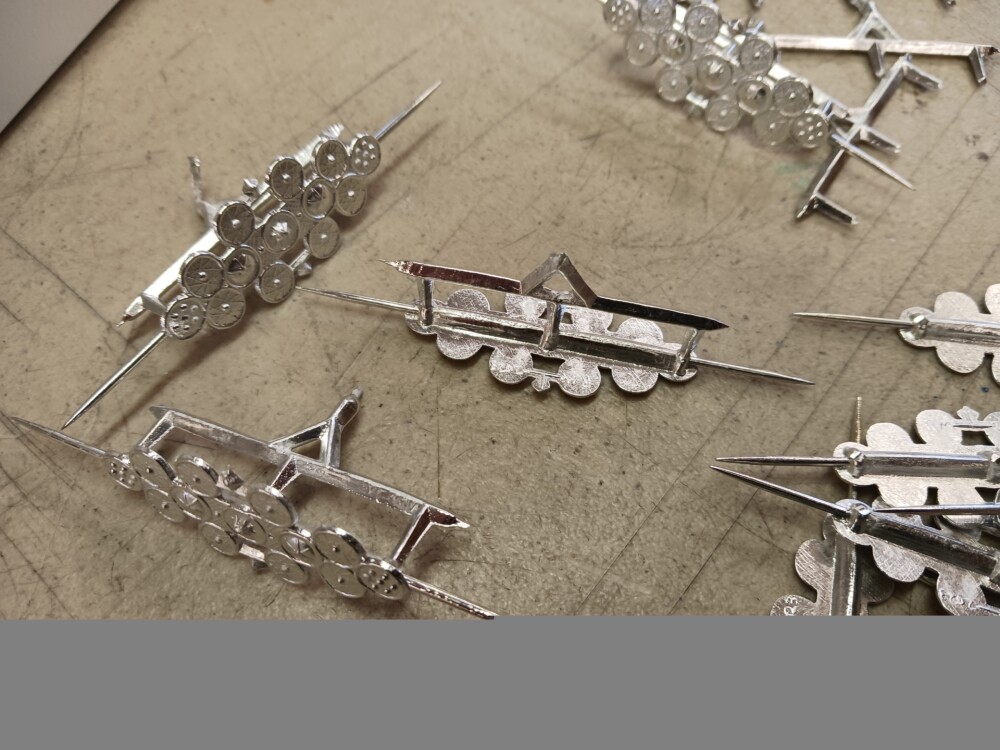
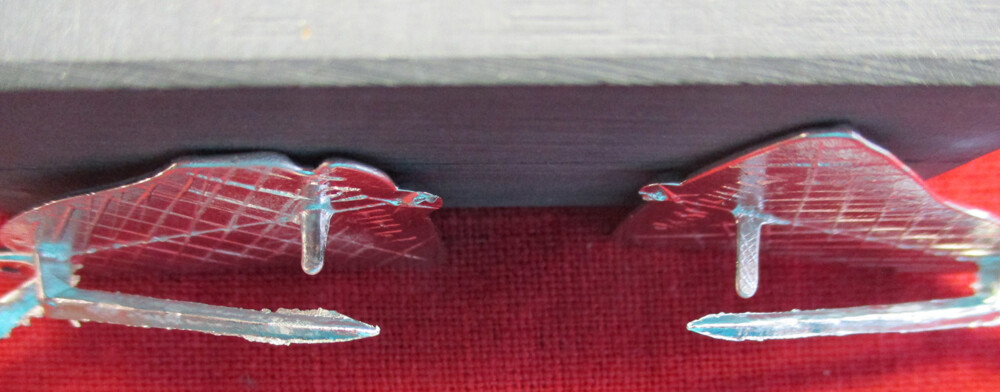
Unfortunately, in many of these castings, the retaining hook for the pin also did not cast – and no one wants a livery badge that won’t stay on. (The little tongue becomes a hook/catch for the pin; the one on the left, below, is too short.)
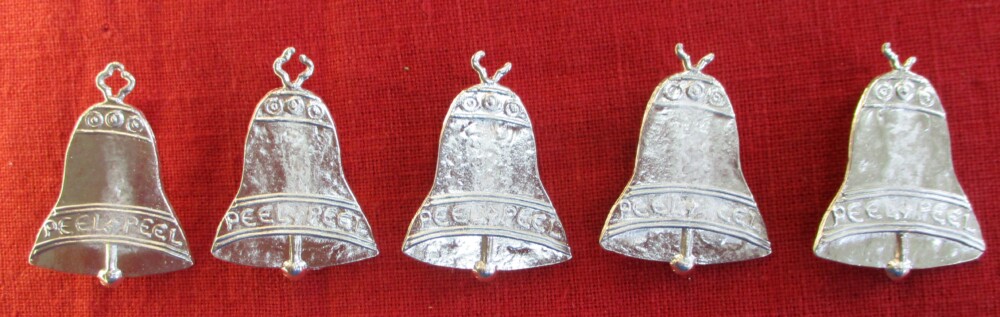
The easiest shortfall to create is the one Mac got, where the quatrefoil loop doesn’t cast fully. That can be produced time after time by not filling the mold to the top of the sprue so there’s not enough pressure to send the metal up into the loop. Here’s a selection of castings, starting with a near miss at left (the loop almost closed) and ending with a couple of pitiful stubs.
The failure to fill the rim of the bell to the edge is trickier – Marianne had to press one of the halves of the mold back down hard while letting the other side fill normally. This incidentally led to some casts where the loop was very flashy, but that is hardly a defect, since the flash is easily removed.
This did produce incomplete casts with crinkly edges. And the surfaces were often not what we prefer. But she never got the requested holes. Her rogues gallery of usable, but incomplete casts:
We’ll see which of these the Compagnie likes and which are just too much. Meanwhile, we’ll finish up with a thought experiment about the Middle Ages: You’ve heard of re-enacting groups having a five-foot (two-meter) standard for authenticity – if it looks authentic from five feet, it’s okay. For pewter livery badges you might employ a ten-foot (three- meter) rule. From that distance you should be able to tell what the badge depicts well enough to identify whose livery it is. If you can’t, the lord needs a new device – or a new badge. If you can, even if the casting is incomplete, it’s okay!